Gear Reviews

Ten different ways we power our campsite with Jackery

Ten months ago Em and I moved to a fifteen acre site in Lincolnshire, which we lovingly call the Big Sky Hideaway. After months of figuring out how to power different areas of our site we’ve finally found the solution in a range of battery and solar panel products made by a company called Jackery.

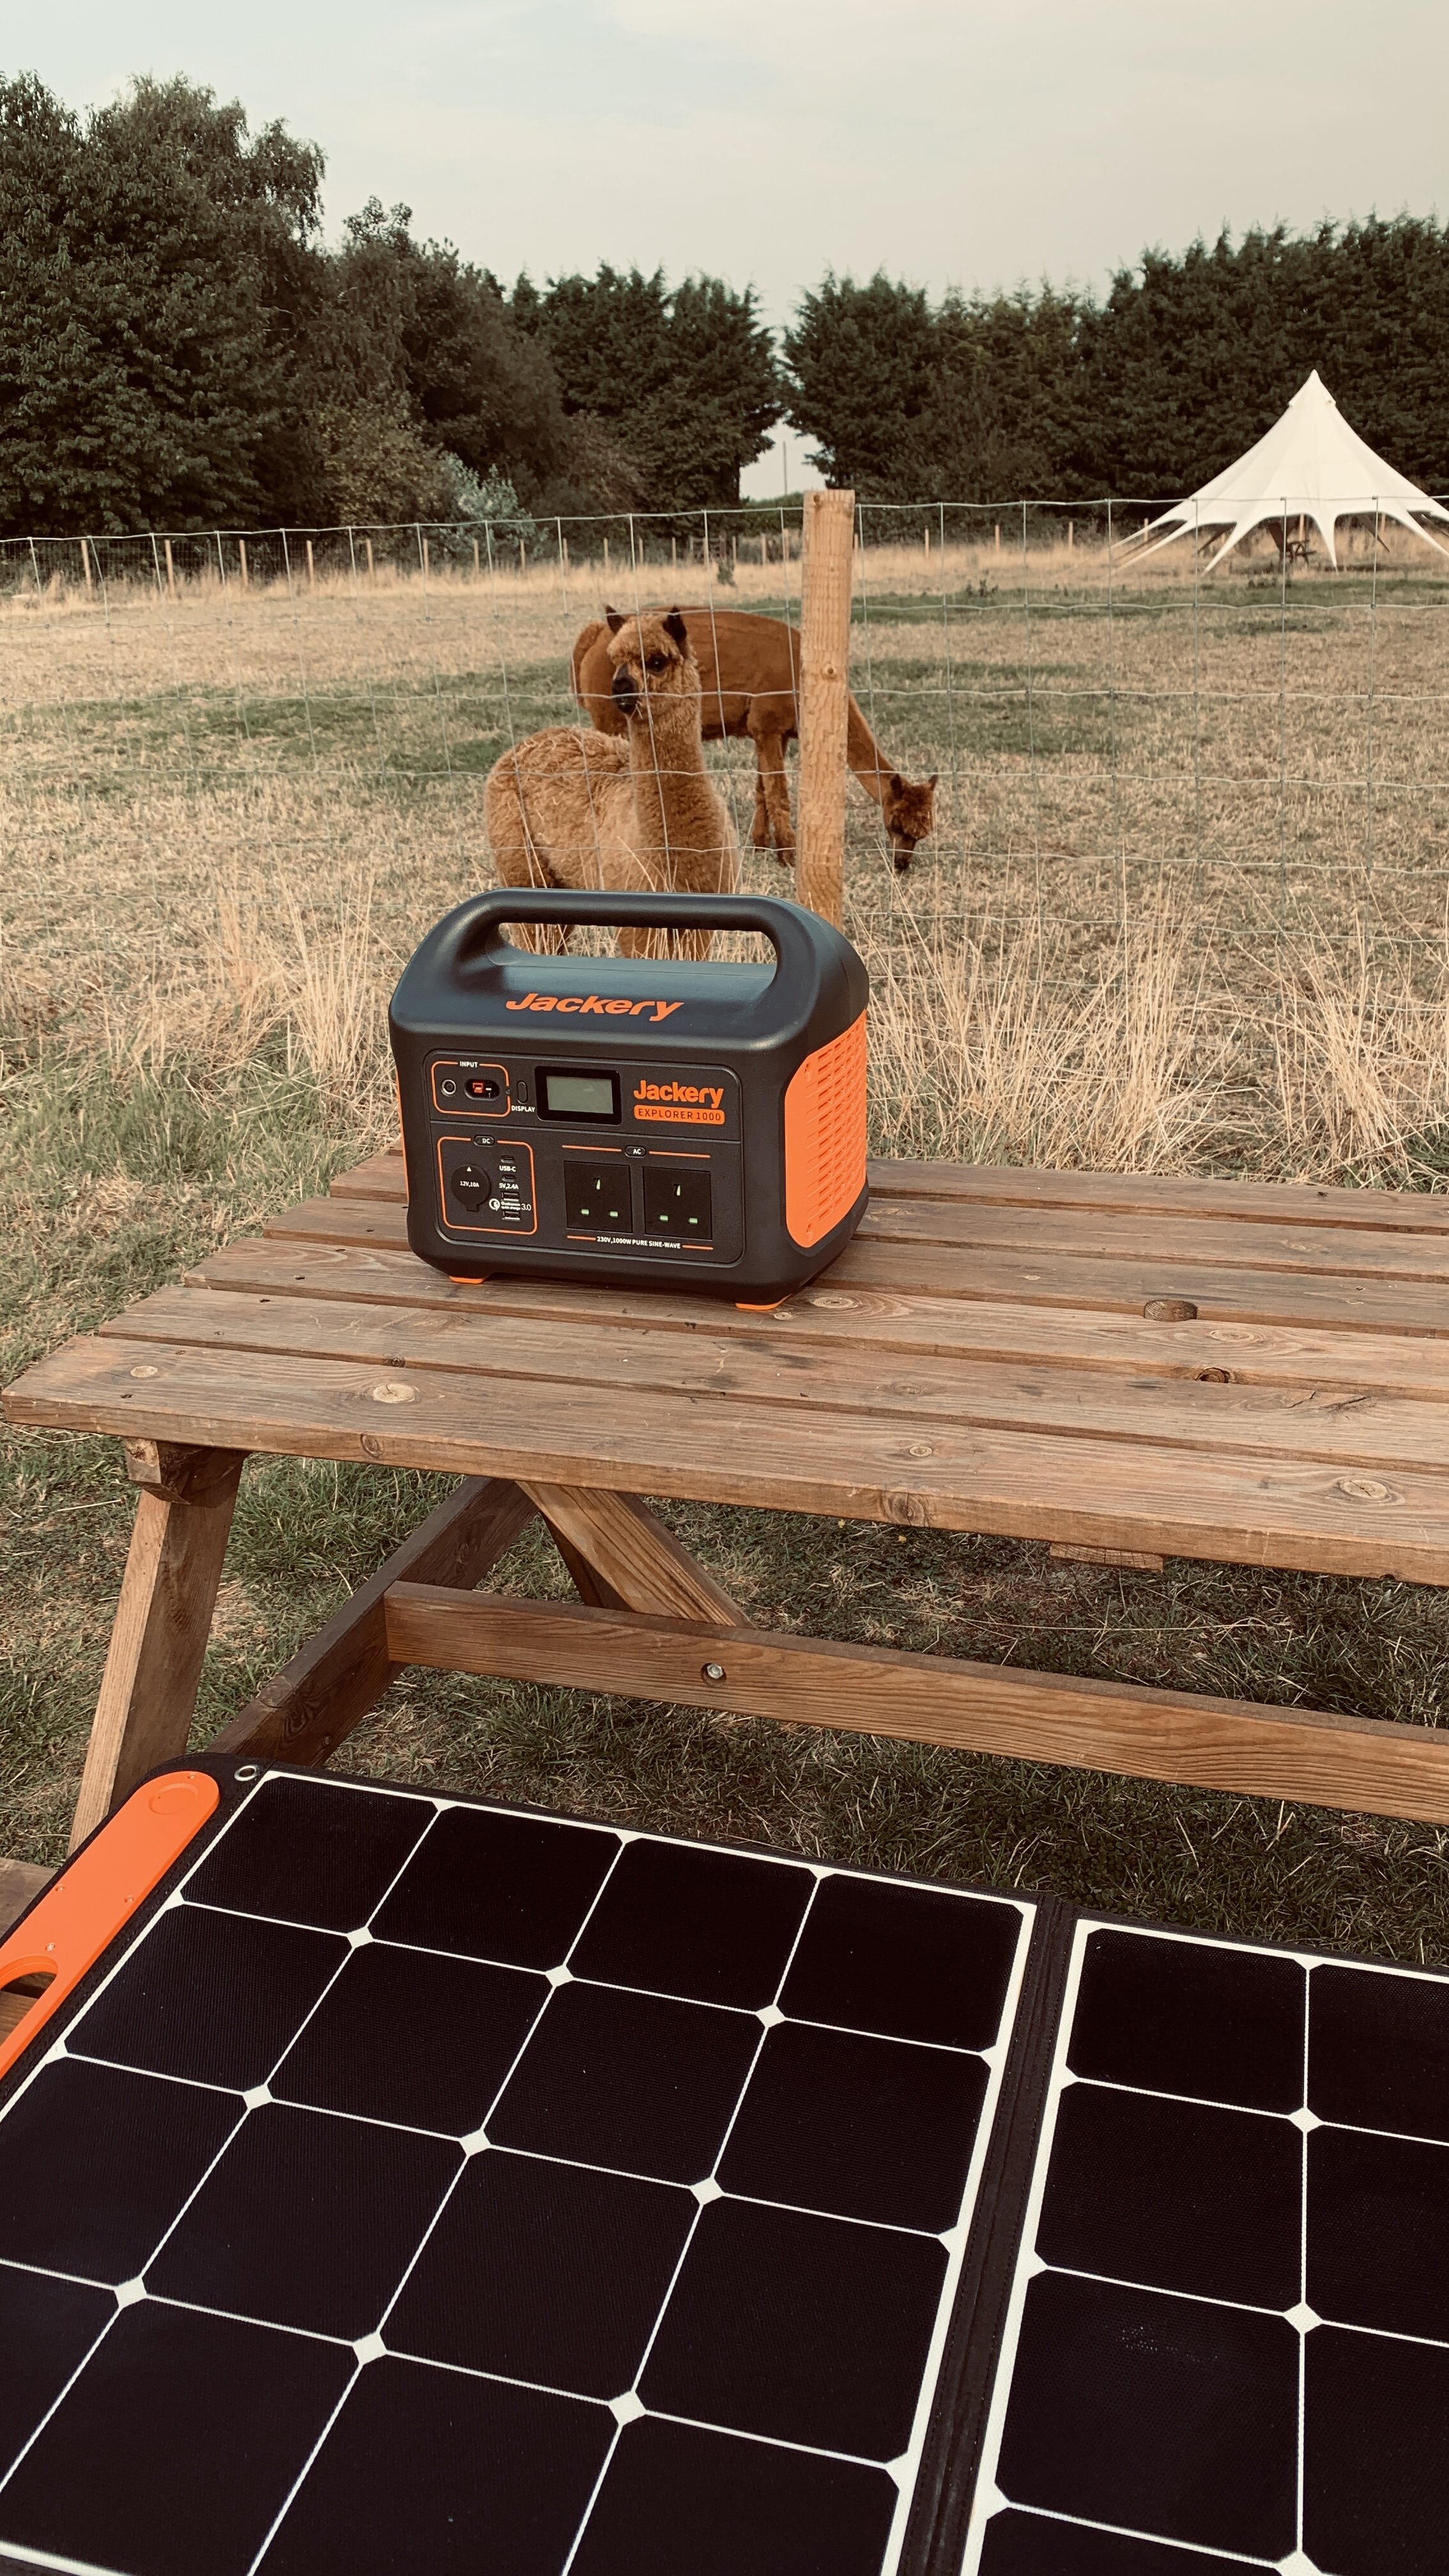
The Big Sky Hideaway is home to some very cool accommodation options like converted buses and Landpods, a spacious camping meadow, a small herd of fluffy alpacas, a bunch of eco-friendly toilet and shower blocks, a couple of field kitchens and a big old barn that we’re turning into a community space. Plus a lot lot more.

Alpaca.JPG

From the off it was important to us that we power the site using renewable energy. We’re here for the long run and in that sense, renewables and solar in particular are as clever for our finances as they are good for the environment.

For a few months we looked at more conventional options for installing solar power but it never felt straight forward. Buying in solar converters, panels, batteries and inverters felt like a huge headache given we like simplicity, and with multiple areas to power on site we felt restricted with investing in solar for our barn, which was the priority.

And then we found Jackery. The idea of a portable electric battery with an outgoing wattage to rival the existing system on our converted double decker (The YesBus) felt dreamy, but could it really do everything we needed it to?

After a few weeks of research and general envy looking at the Jackery channel on Instagram we decided on our favourite options and then stared at our parcel box for 48 hours!

We opted for:

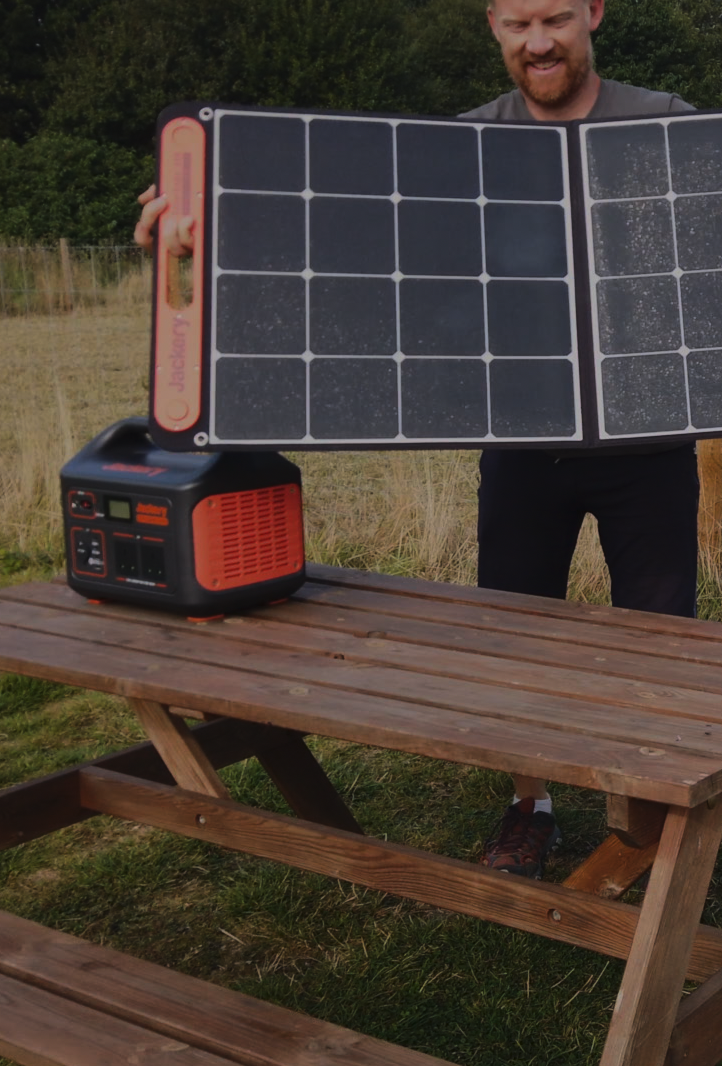
1 x Jackery Explorer 1000 Portable Power Station

2 x Jackery SolarSaga 100 Solar Panels

The aim was to test the power station and panels all over site in a number of different ways and then figure out whether or not the Jackery gear worked, and if it did then whether or not we needed more panels and power stations to ensure our off grid site never ran out of power.


The unboxing

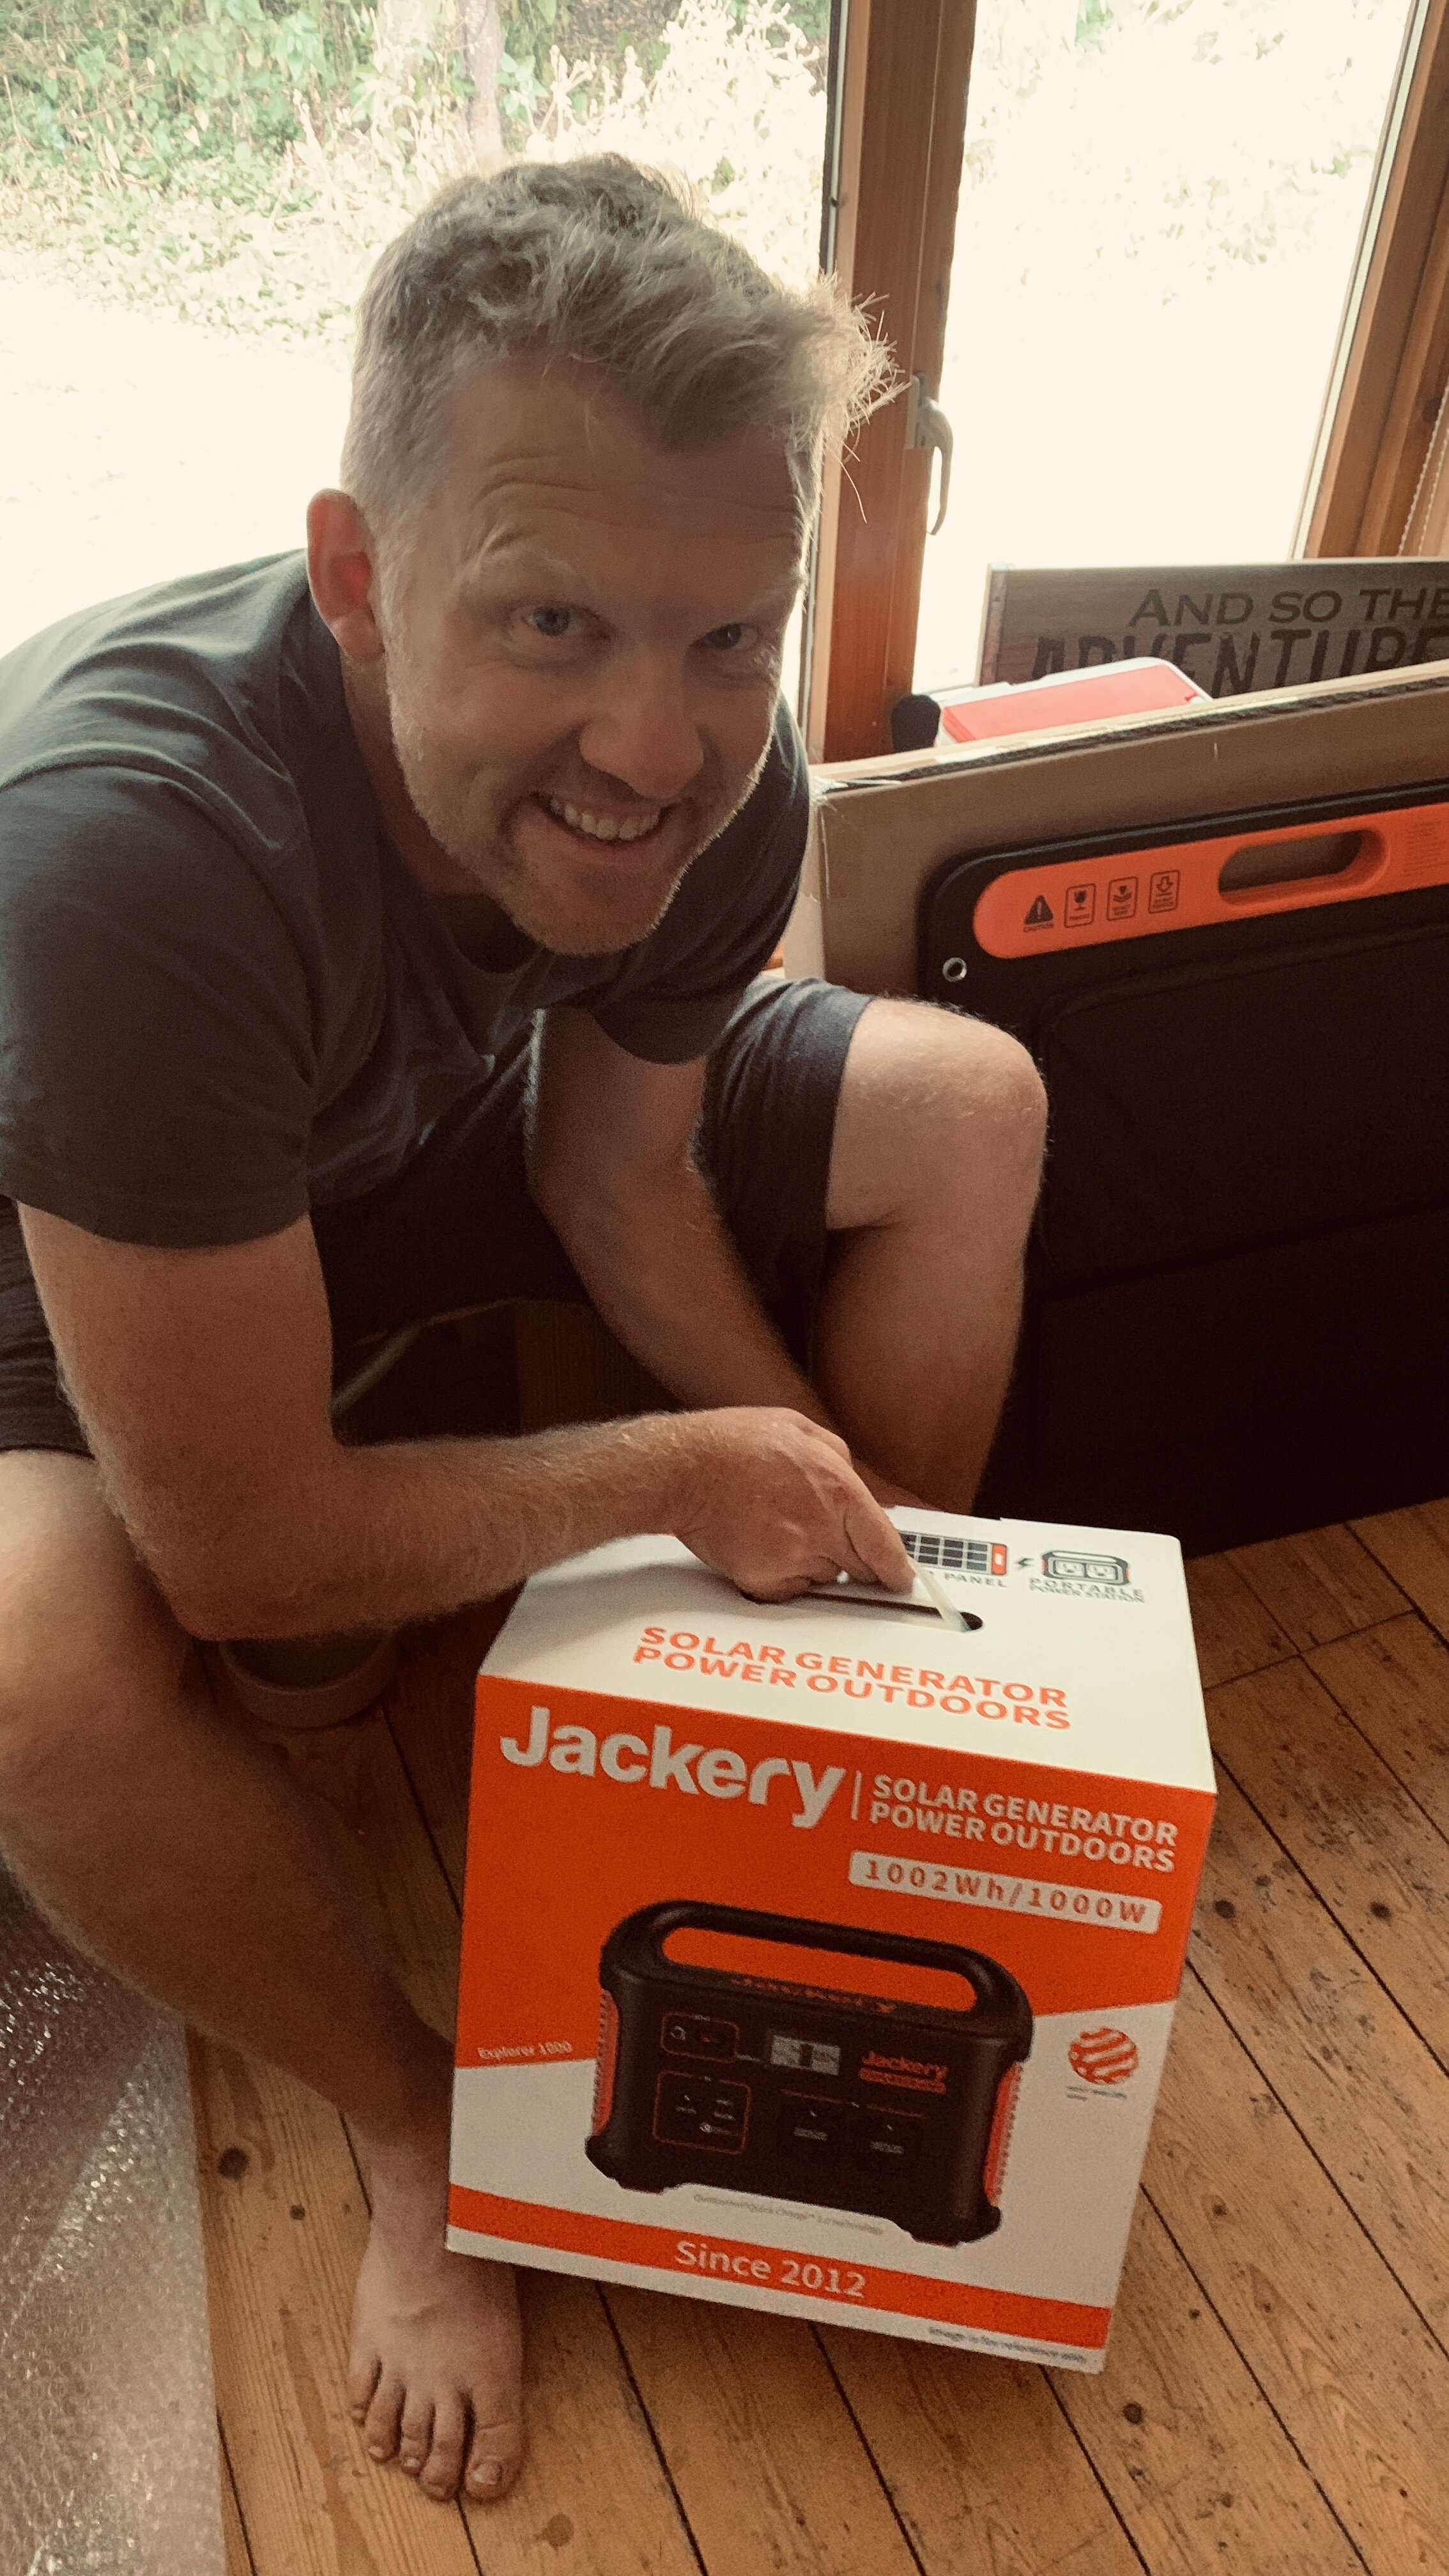
Jackery have definitely got their branding spot on. Of all the portable electric power stations on the market it’s hard to find any that come close to Jackery’s marketing. The packaging is swish, gorgeously put together and doesn’t do anything to numb the pending excitement of discovering what is inside.

And inside, there’s zero disappointment.

Panel fold-out.PNG

The Explorer 1000 is one of Jackery’s largest units and it’s a weighty little number, coming in at just under 10kg. It’s really well designed with rounded corners and edges and an inbuilt handle that makes for comfortable carrying. It’s solid, feels like it could withstand a bump or two, and frankly would make the best gift for a friend you want to really, really like you.

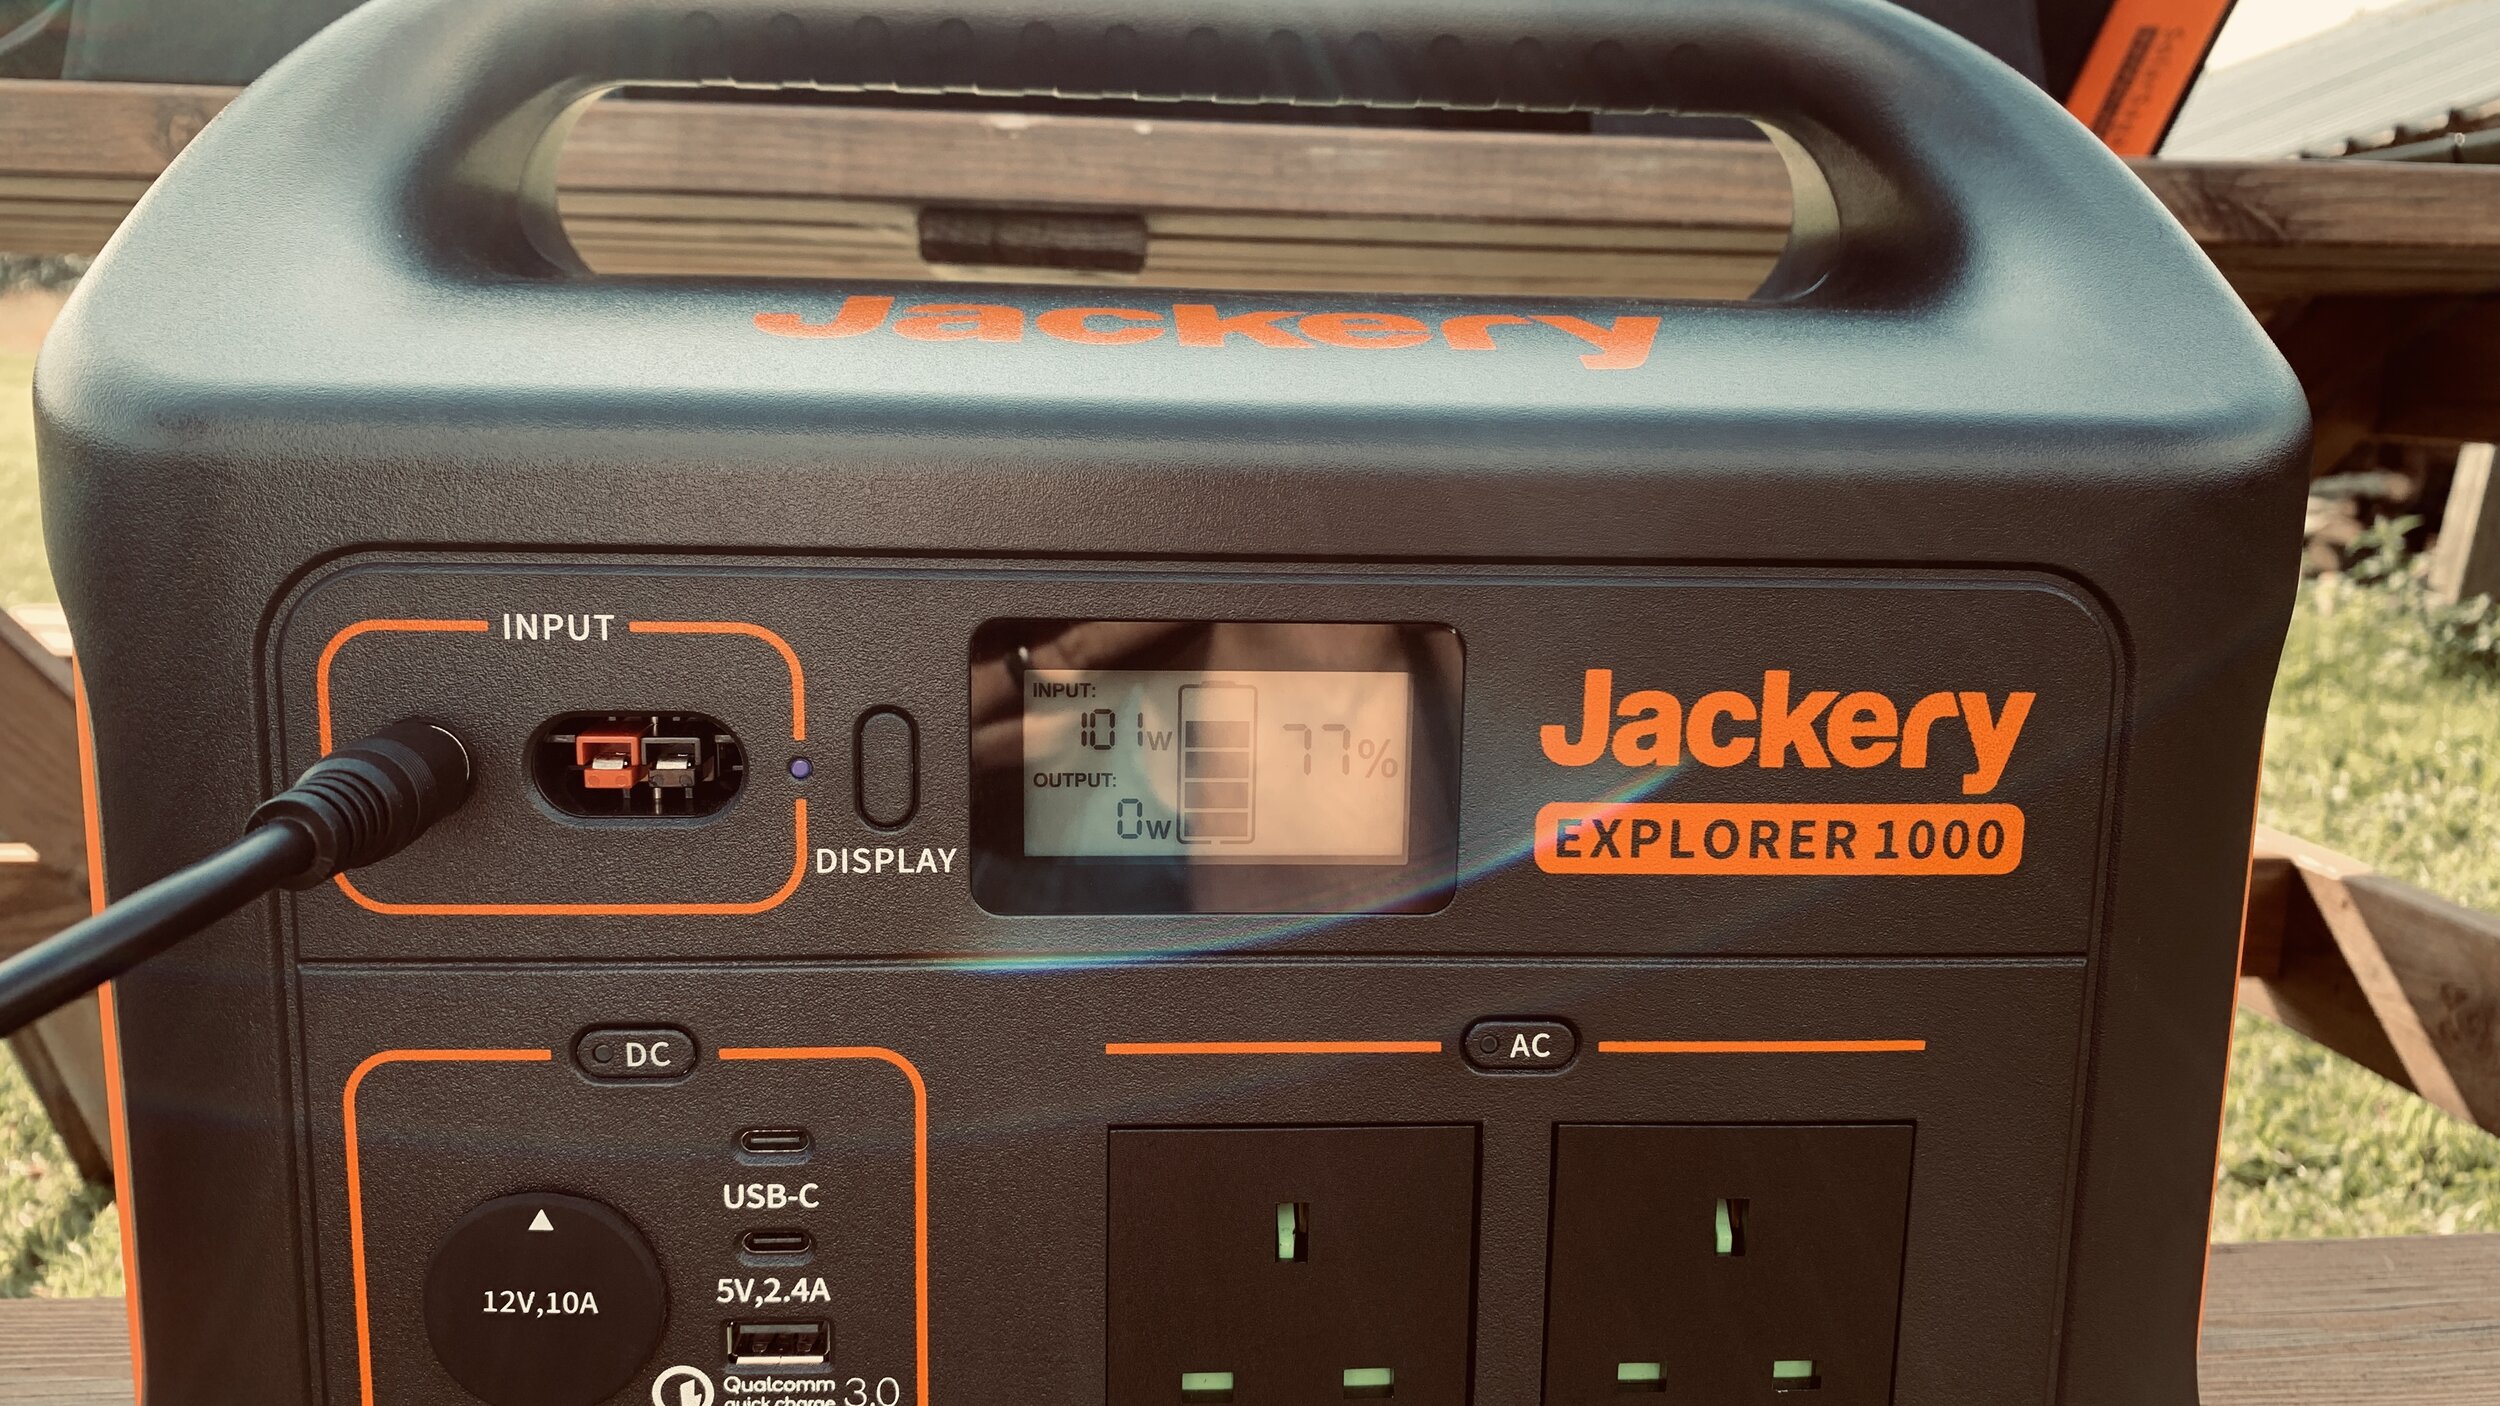
The Explorer 1000 boasts two 230V three-pin plugs (if you get it from the UK store, as we did), 2 x USB-C ports and 2 x USB ports, one of them a Quick Charge 3.0 output. There’s also a 12v car port (cigarette lighter style) and two inputs, including an anderson adaptor.

I was just as enthusiastic about the SolarSaga 100 panels as the power station. They’re folded in half with a hard shell with a velcro’d stand on each side of the panel to enable standing at different angles, and the attached charging wire is connecting to the back of the unit within a zippable pouch. The connector slots right into the left-most charging input on the Explorer 1000 power station.


How we use Jackery at the Big Sky Hideaway

We’d told Jackery that we could find endless ways to use their gear on our site and they set us a challenge to record at least ten of these, so….here goes.

1 - Coffee Machine

Coffee machine.JPG

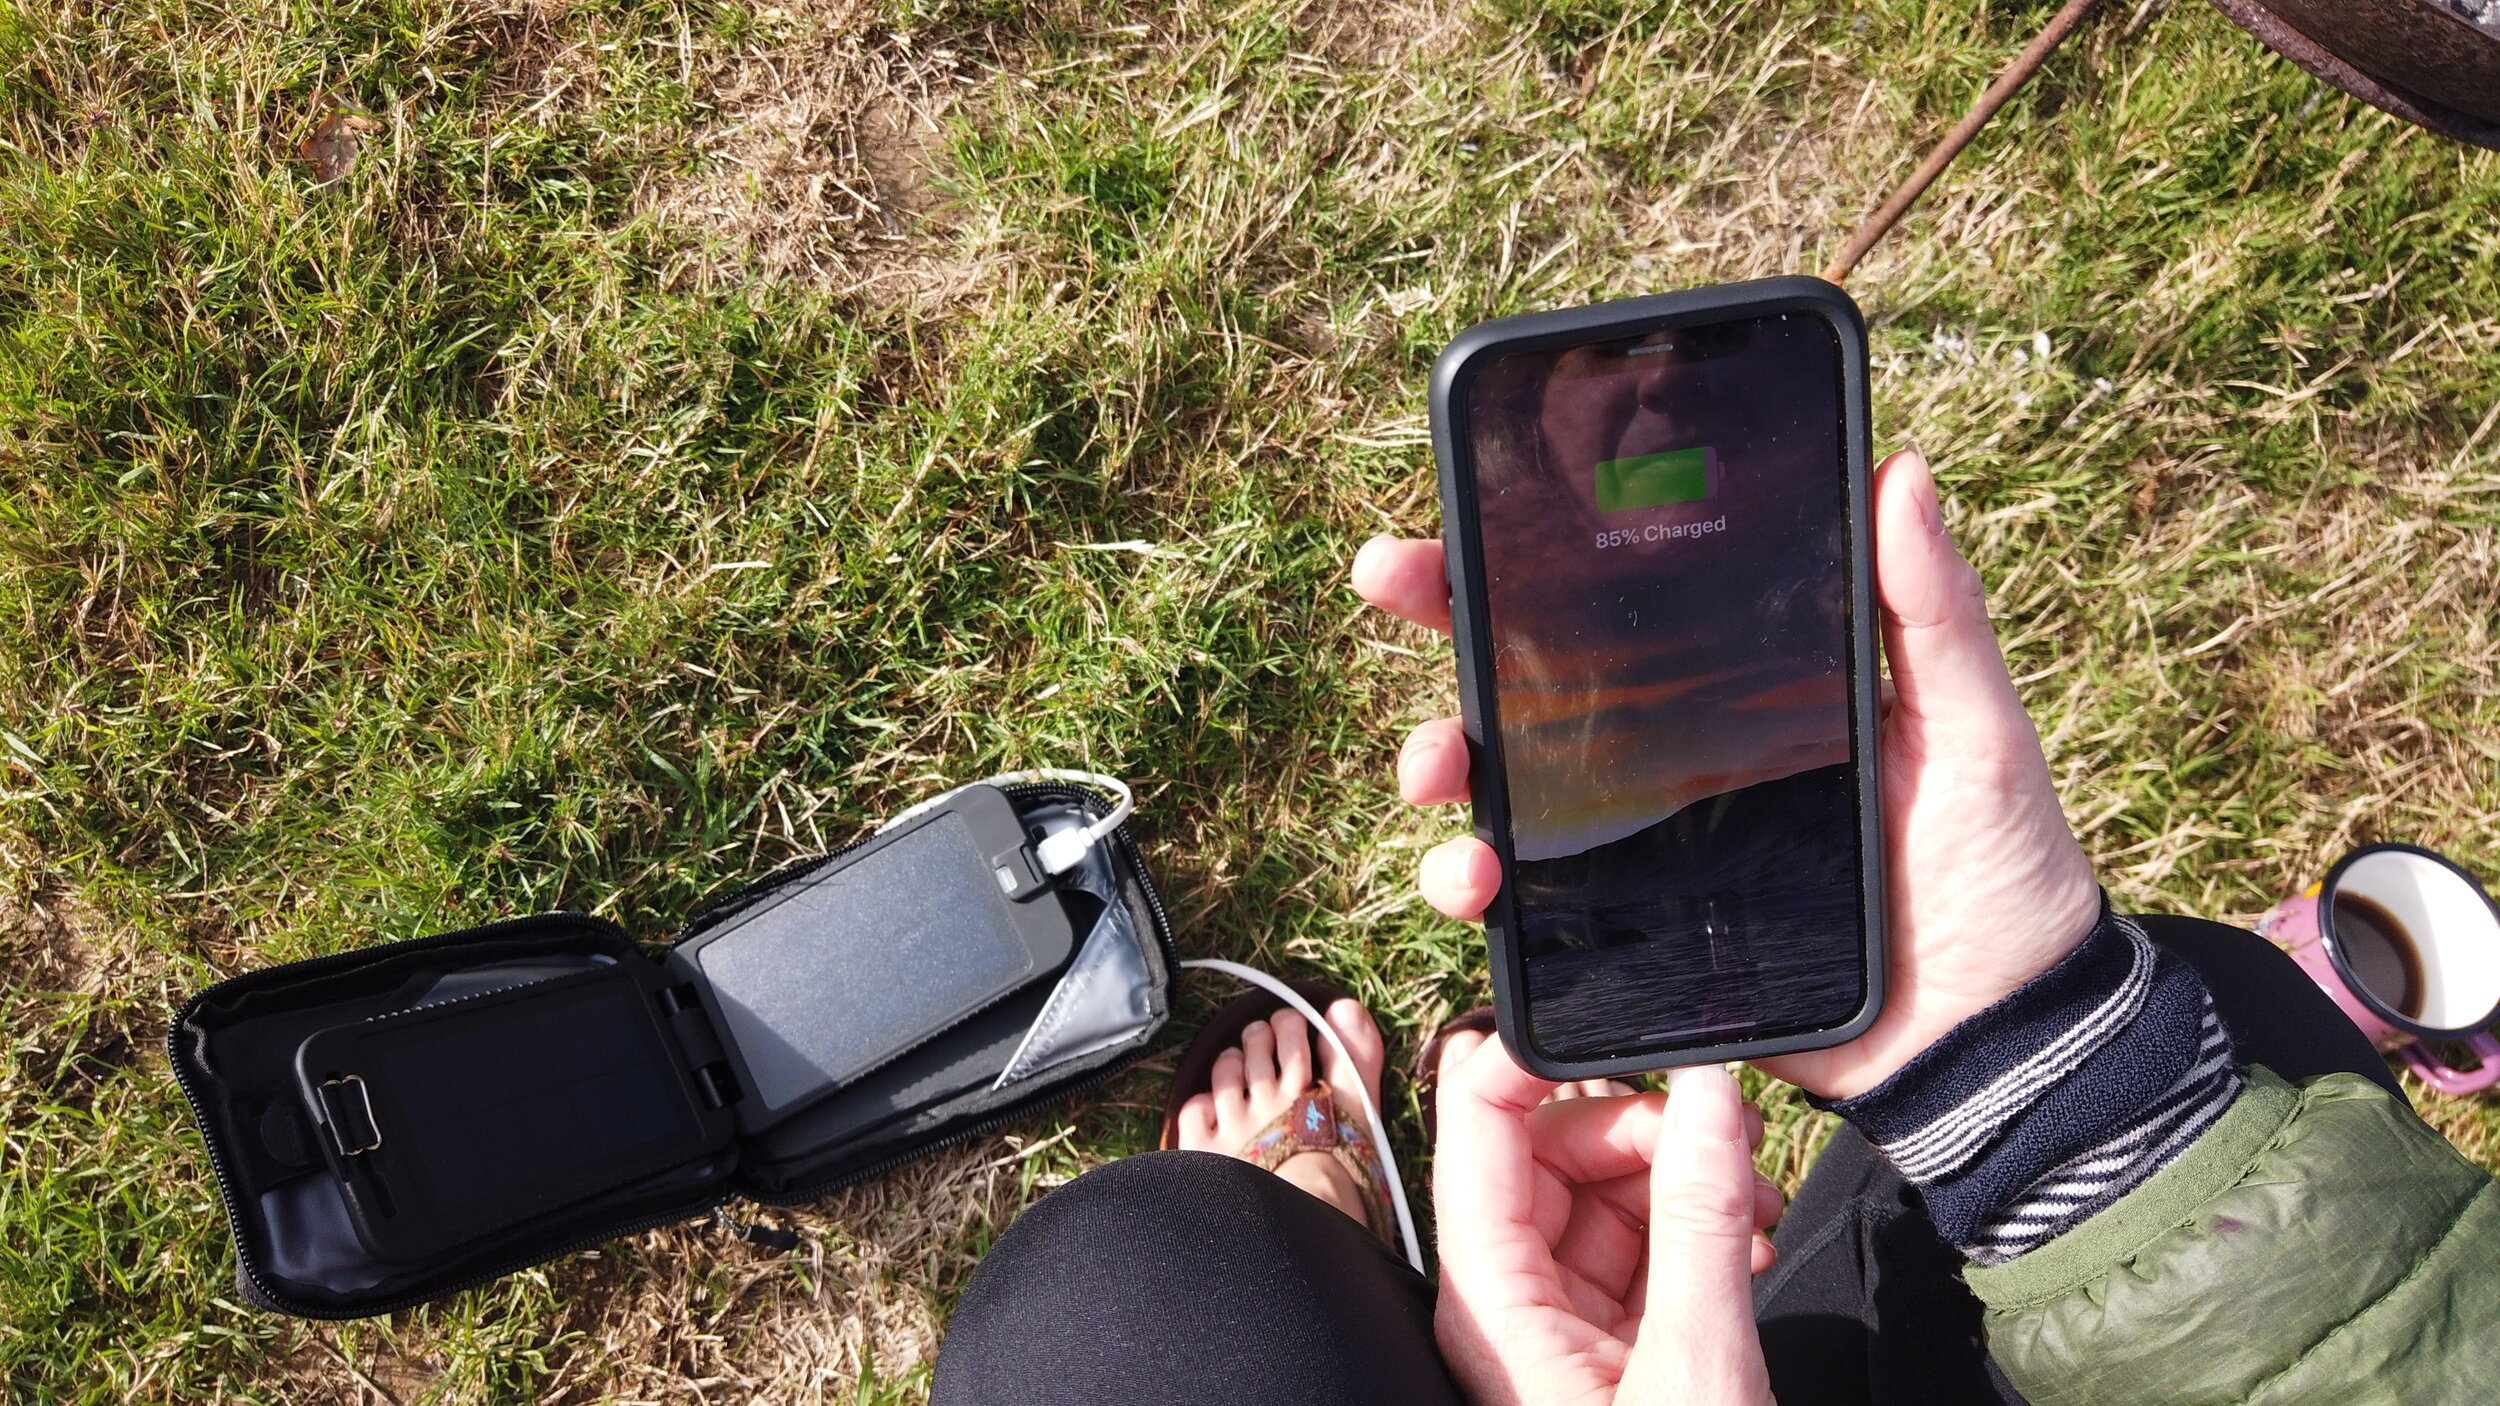
Doesn’t every day start with coffee? Although we love boiling the kettle up over a wood fire we headed over to the Cosy Cocoon Landpod in our woodland and set up the Explorer 1000 Power Station in the field kitchen, which shelters underneath an old army parachute. Our coffee machine usually lives in our home kitchen but it enjoyed a trip to the woods and the Explorer 1000 didn’t sweat, using up about 15% of its capacity on a full brew.

It’s worth noting that high draw electronics which need over 1000W at peak will not work with the Explorer 1000. Most power tools, hair straighteners, slow cookers and electric heaters would need more than 1000W but our coffee machine takes around 850W, so all good.


2 - Tools

Tool Charging copy.JPG

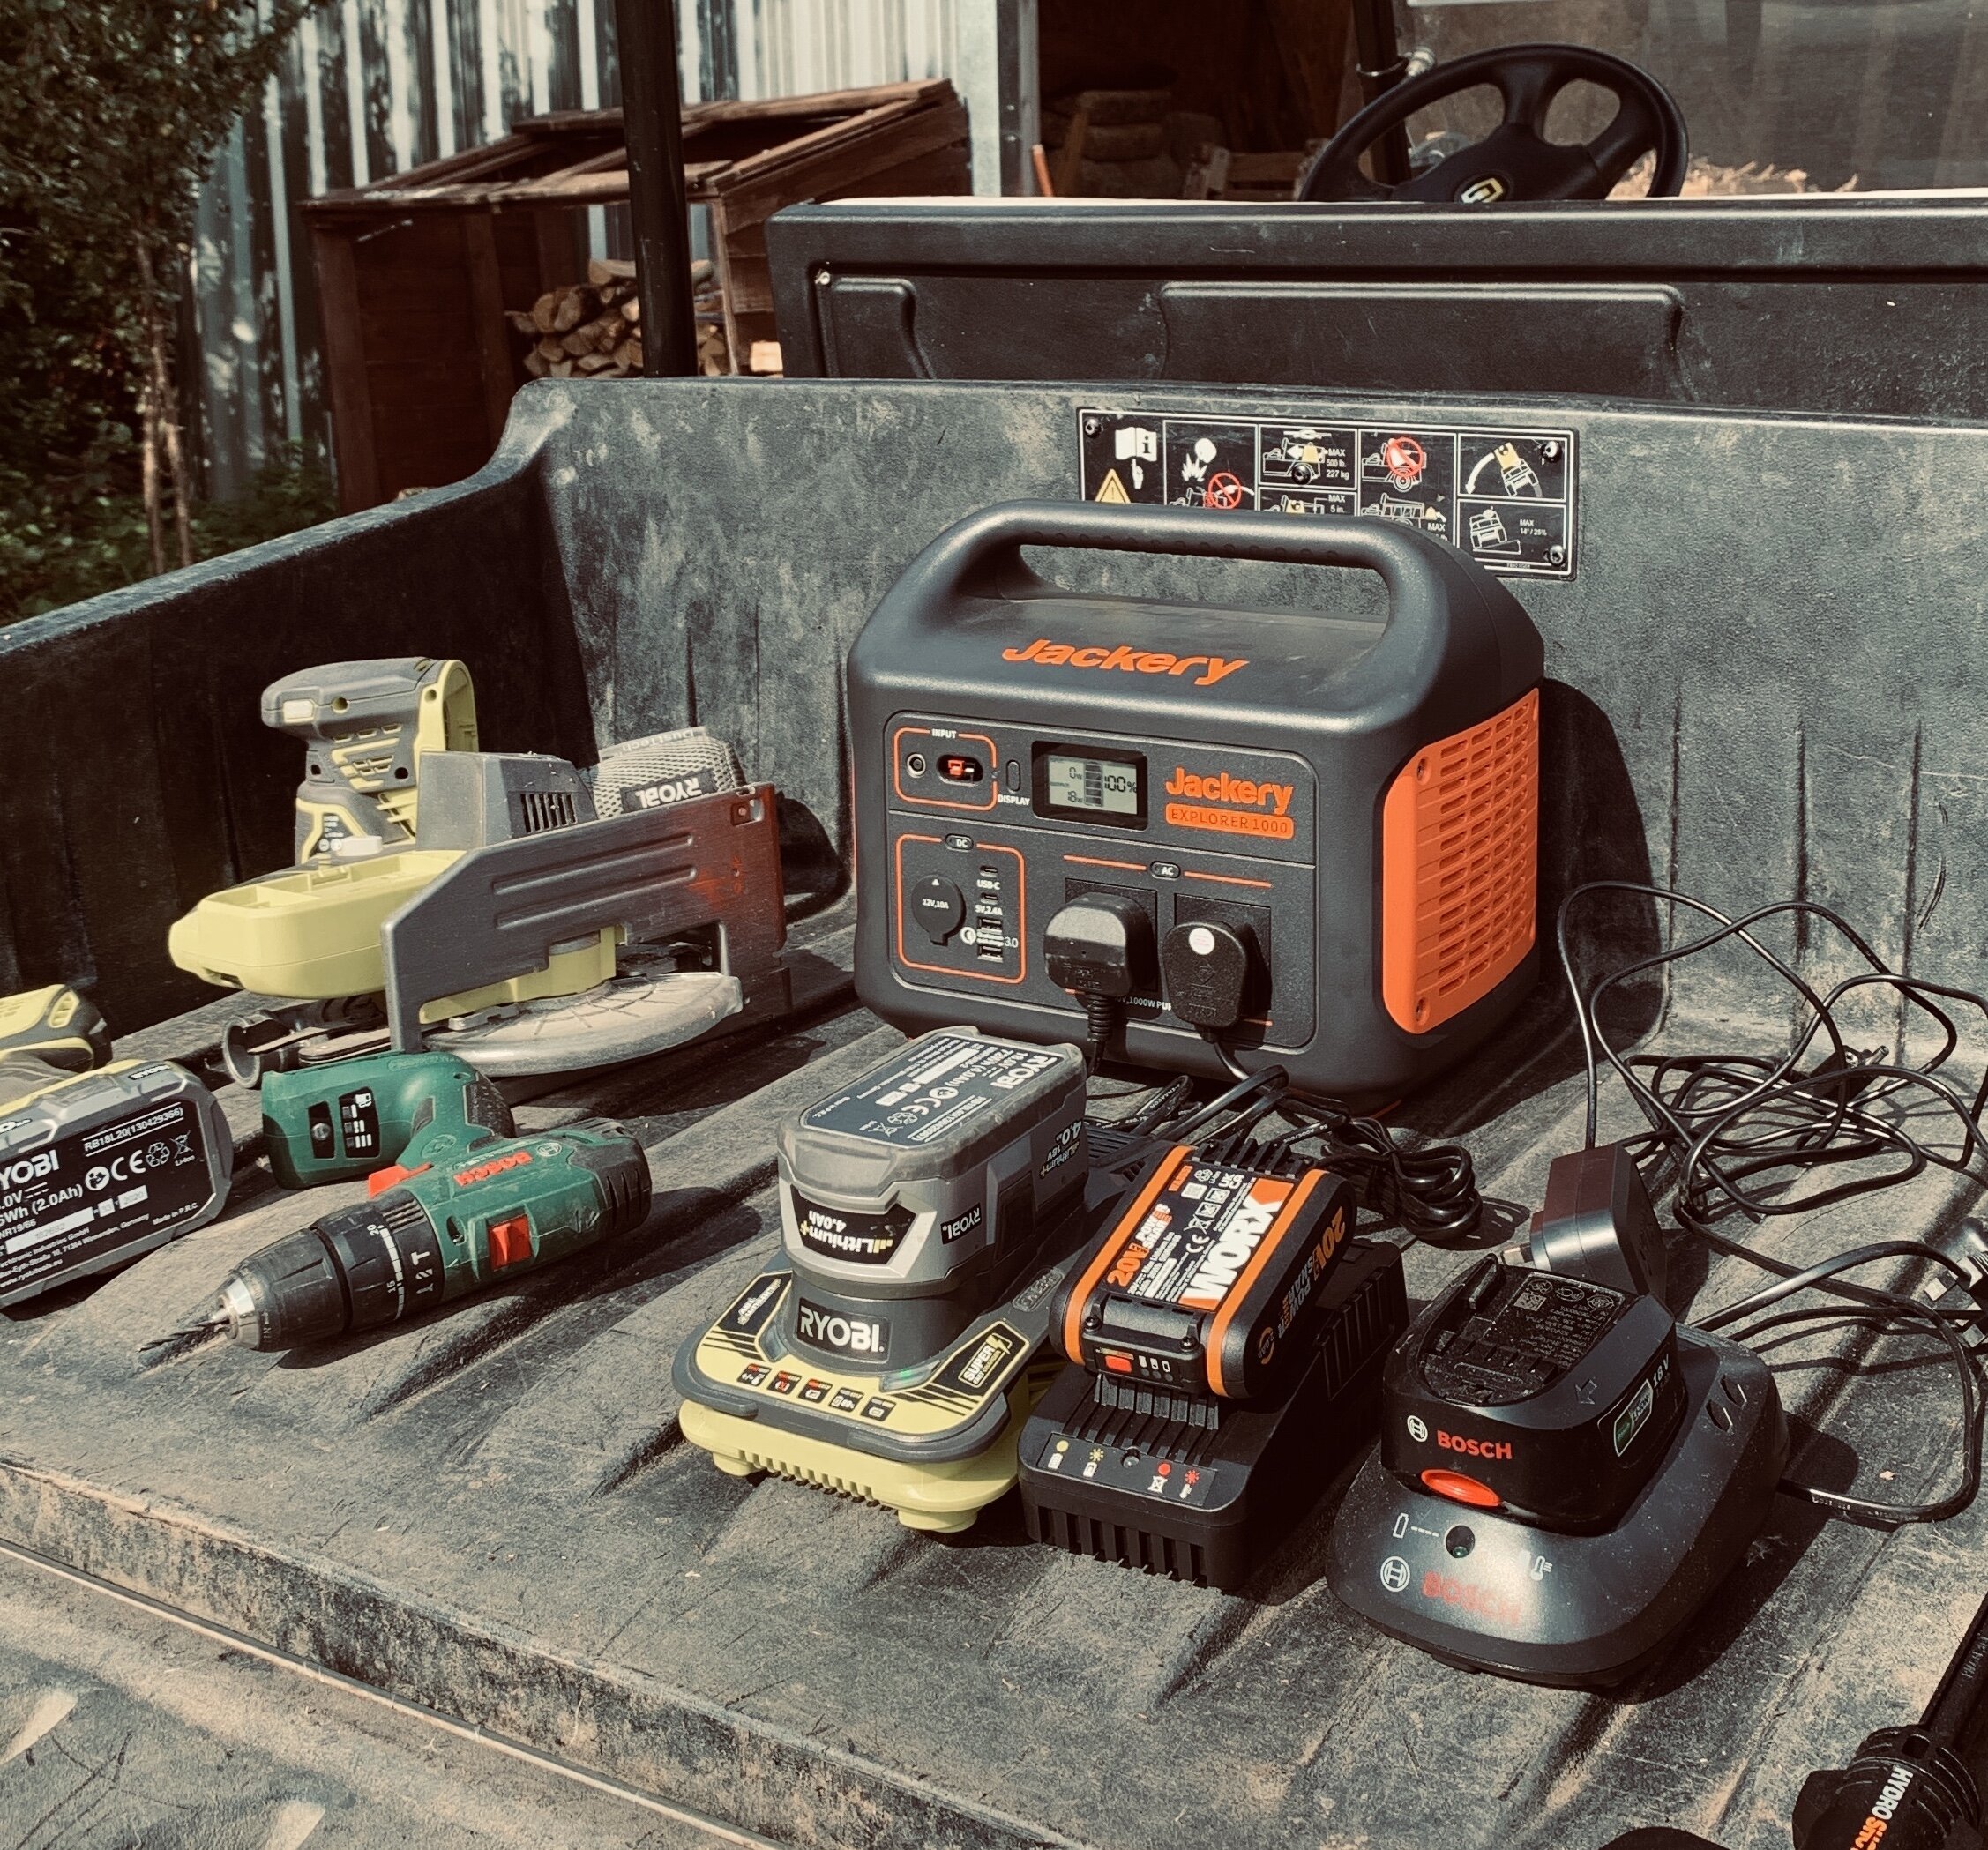
We’re still in Year One at Big Sky so every day is spent creating a new space or building something. Battery-powered tools are our friend and we have batteries to charge for drills, jet washers, strimmers and saws. The Jackery makes mince meat of any of these batteries and can charge our whole battery collection at the same time, eight times over.

If we’re working away from the house the Jackery lives in the back of our electric buggy (which by the way, the Jackery can charge!) and keeps everything powered up. Job done.

3 - Cameras and Drones

With drone.JPG

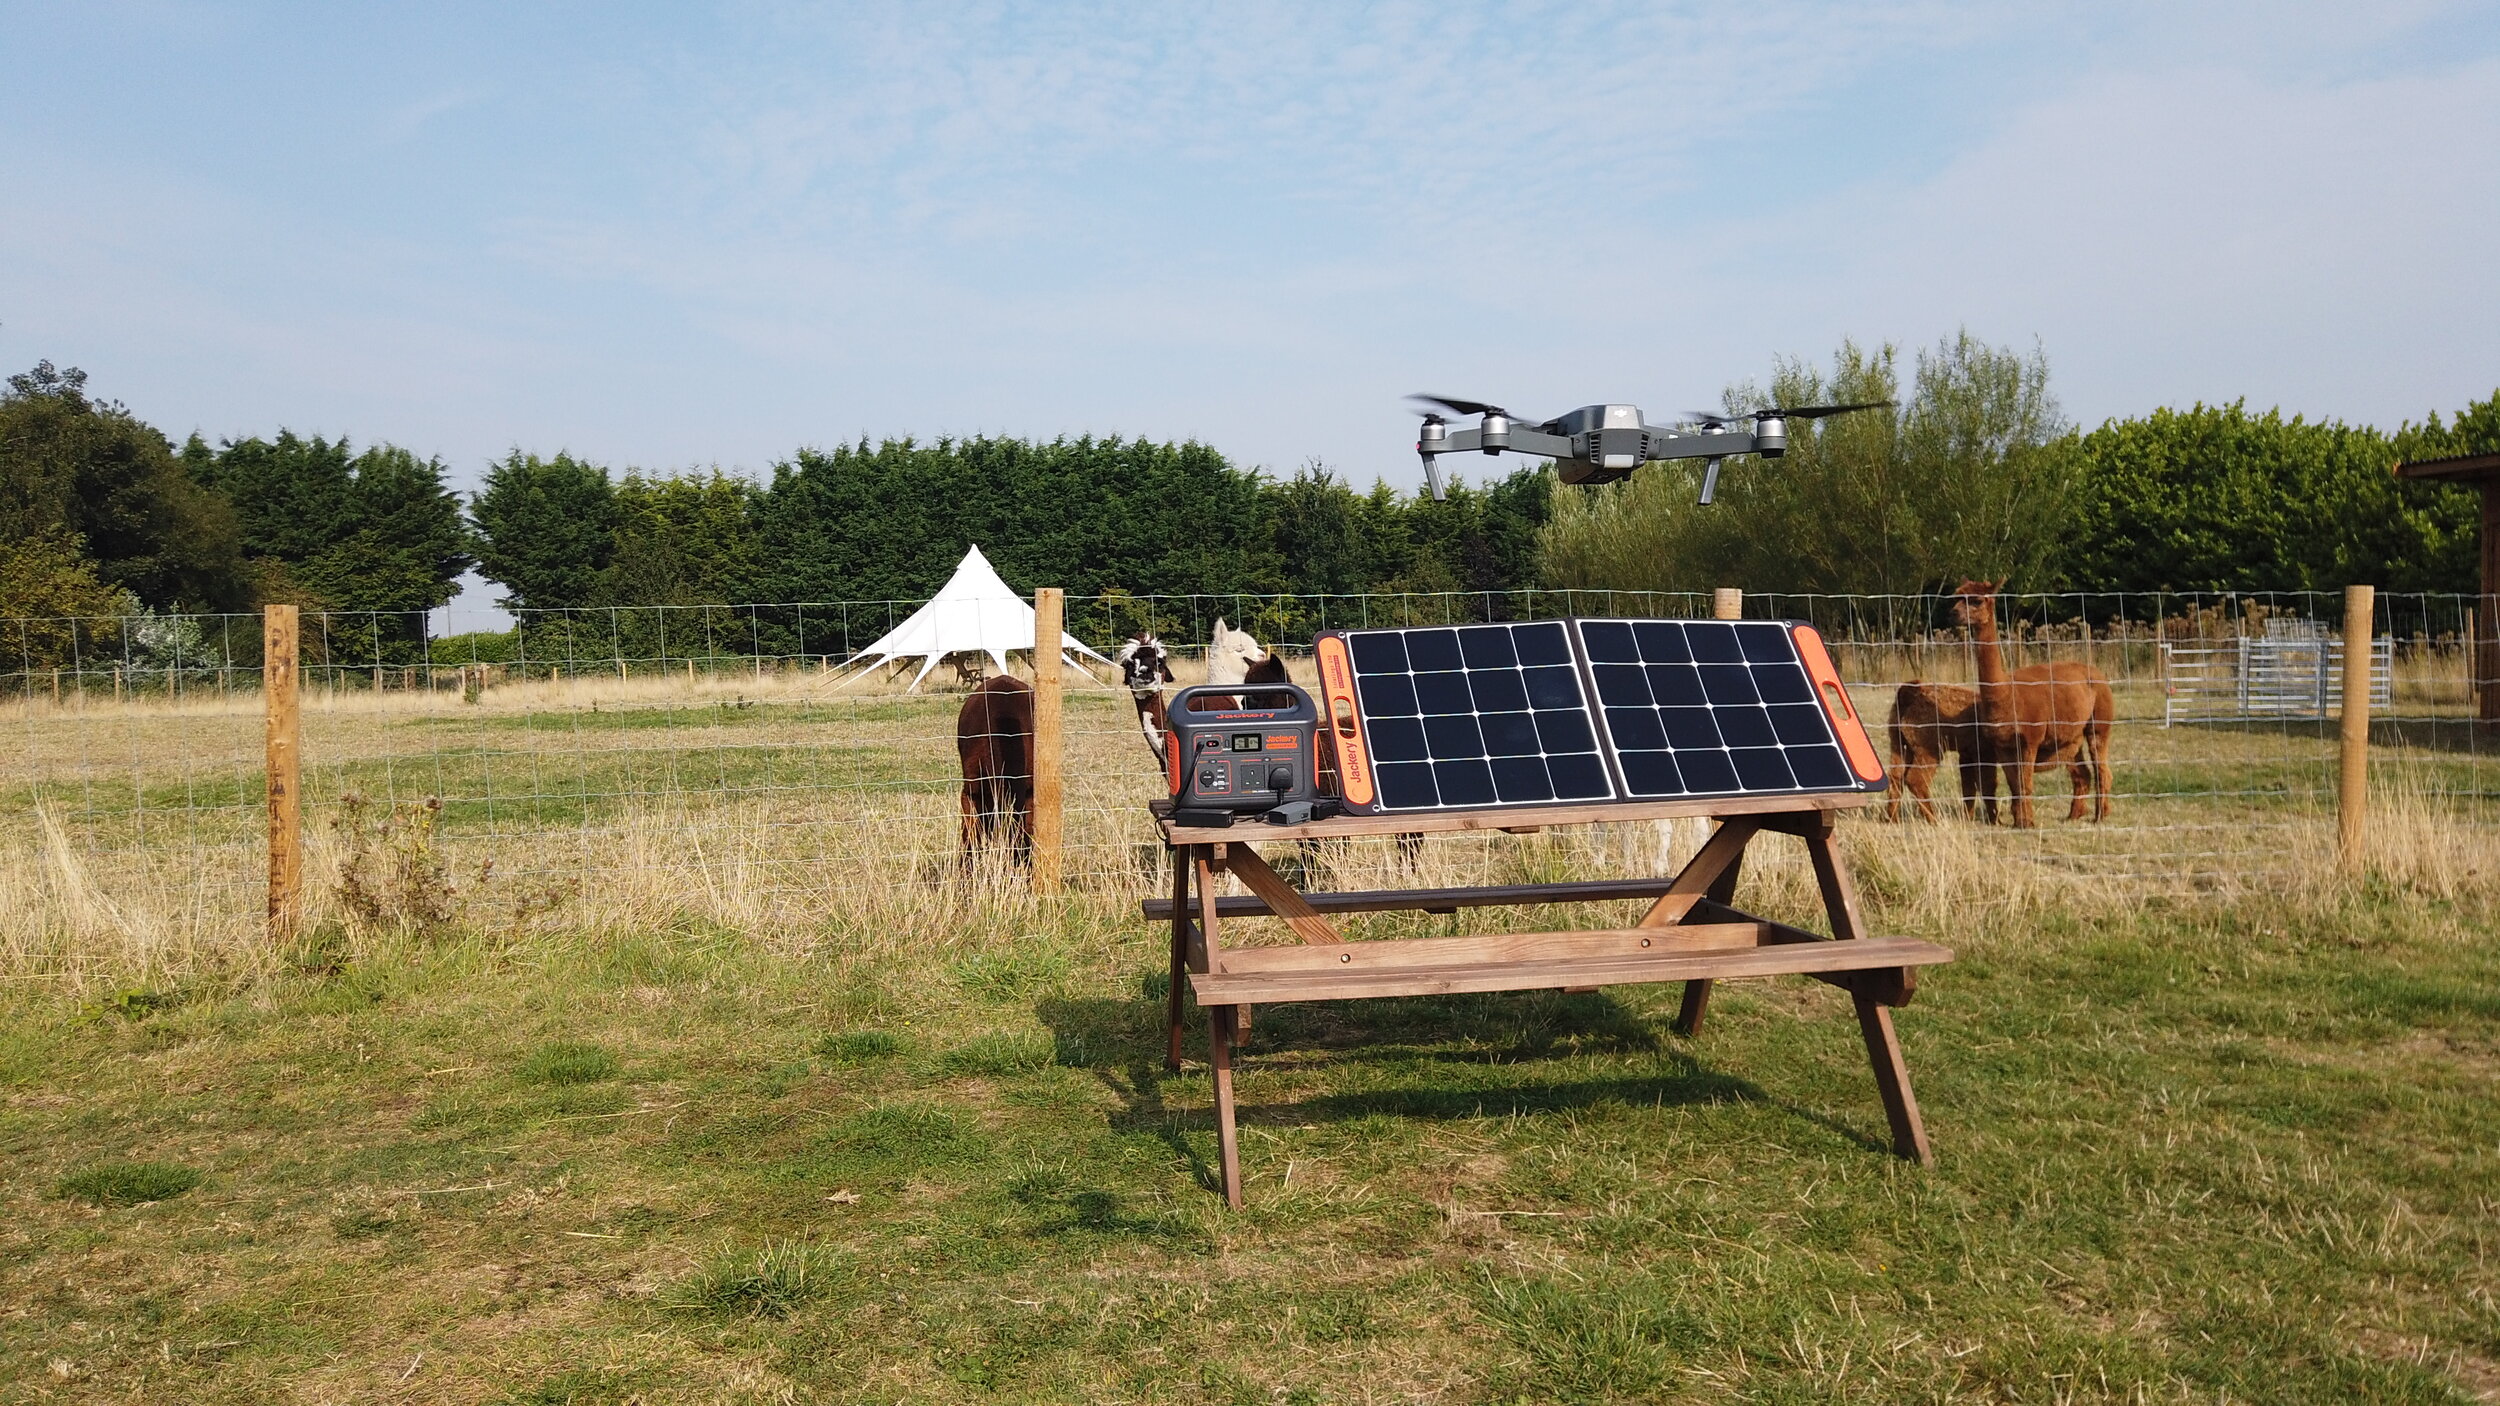
Filmmaking and photography formed a big part of our pre-campsite life and work and not much has changed. Keeping social media channels and our website populated with enticing images is the name of the game for a (hopefully) successful small business and the Jackery Explorer 1000 keeps phones, drones and cameras topped up throughout the day meaning we never miss a shot.


4 - Game time

Sports night.JPG

This is a lifestyle for us and while we work hard it’s great to chill out sometimes. I love my sport and the Explorer 1000 packs enough punch for multiple back-to-back grand prix, football/ tennis matches or like this Summer, day-after-day eventing in the Olympics and Paralympics. Grab a beer, put the TV wherever you like and light the fire. Bingo.


5 - Date night

Date night 2.JPG

This week saw in our third anniversary since we married in a woodland further south. While Em drove out to get a Thai takeaway I rushed around our small meadow setting up fairy lights, firebowls, candles and a nice little music system, which pumped Motown out into the dusk sky. Em loved it, I loved it, the alpacas loved it. Thank you Jackery, that was awesome. Next year we’ll be offering anniversary/ birthday/ special occasion packages that we’re now way more confident in.

6 - OFFice Grid

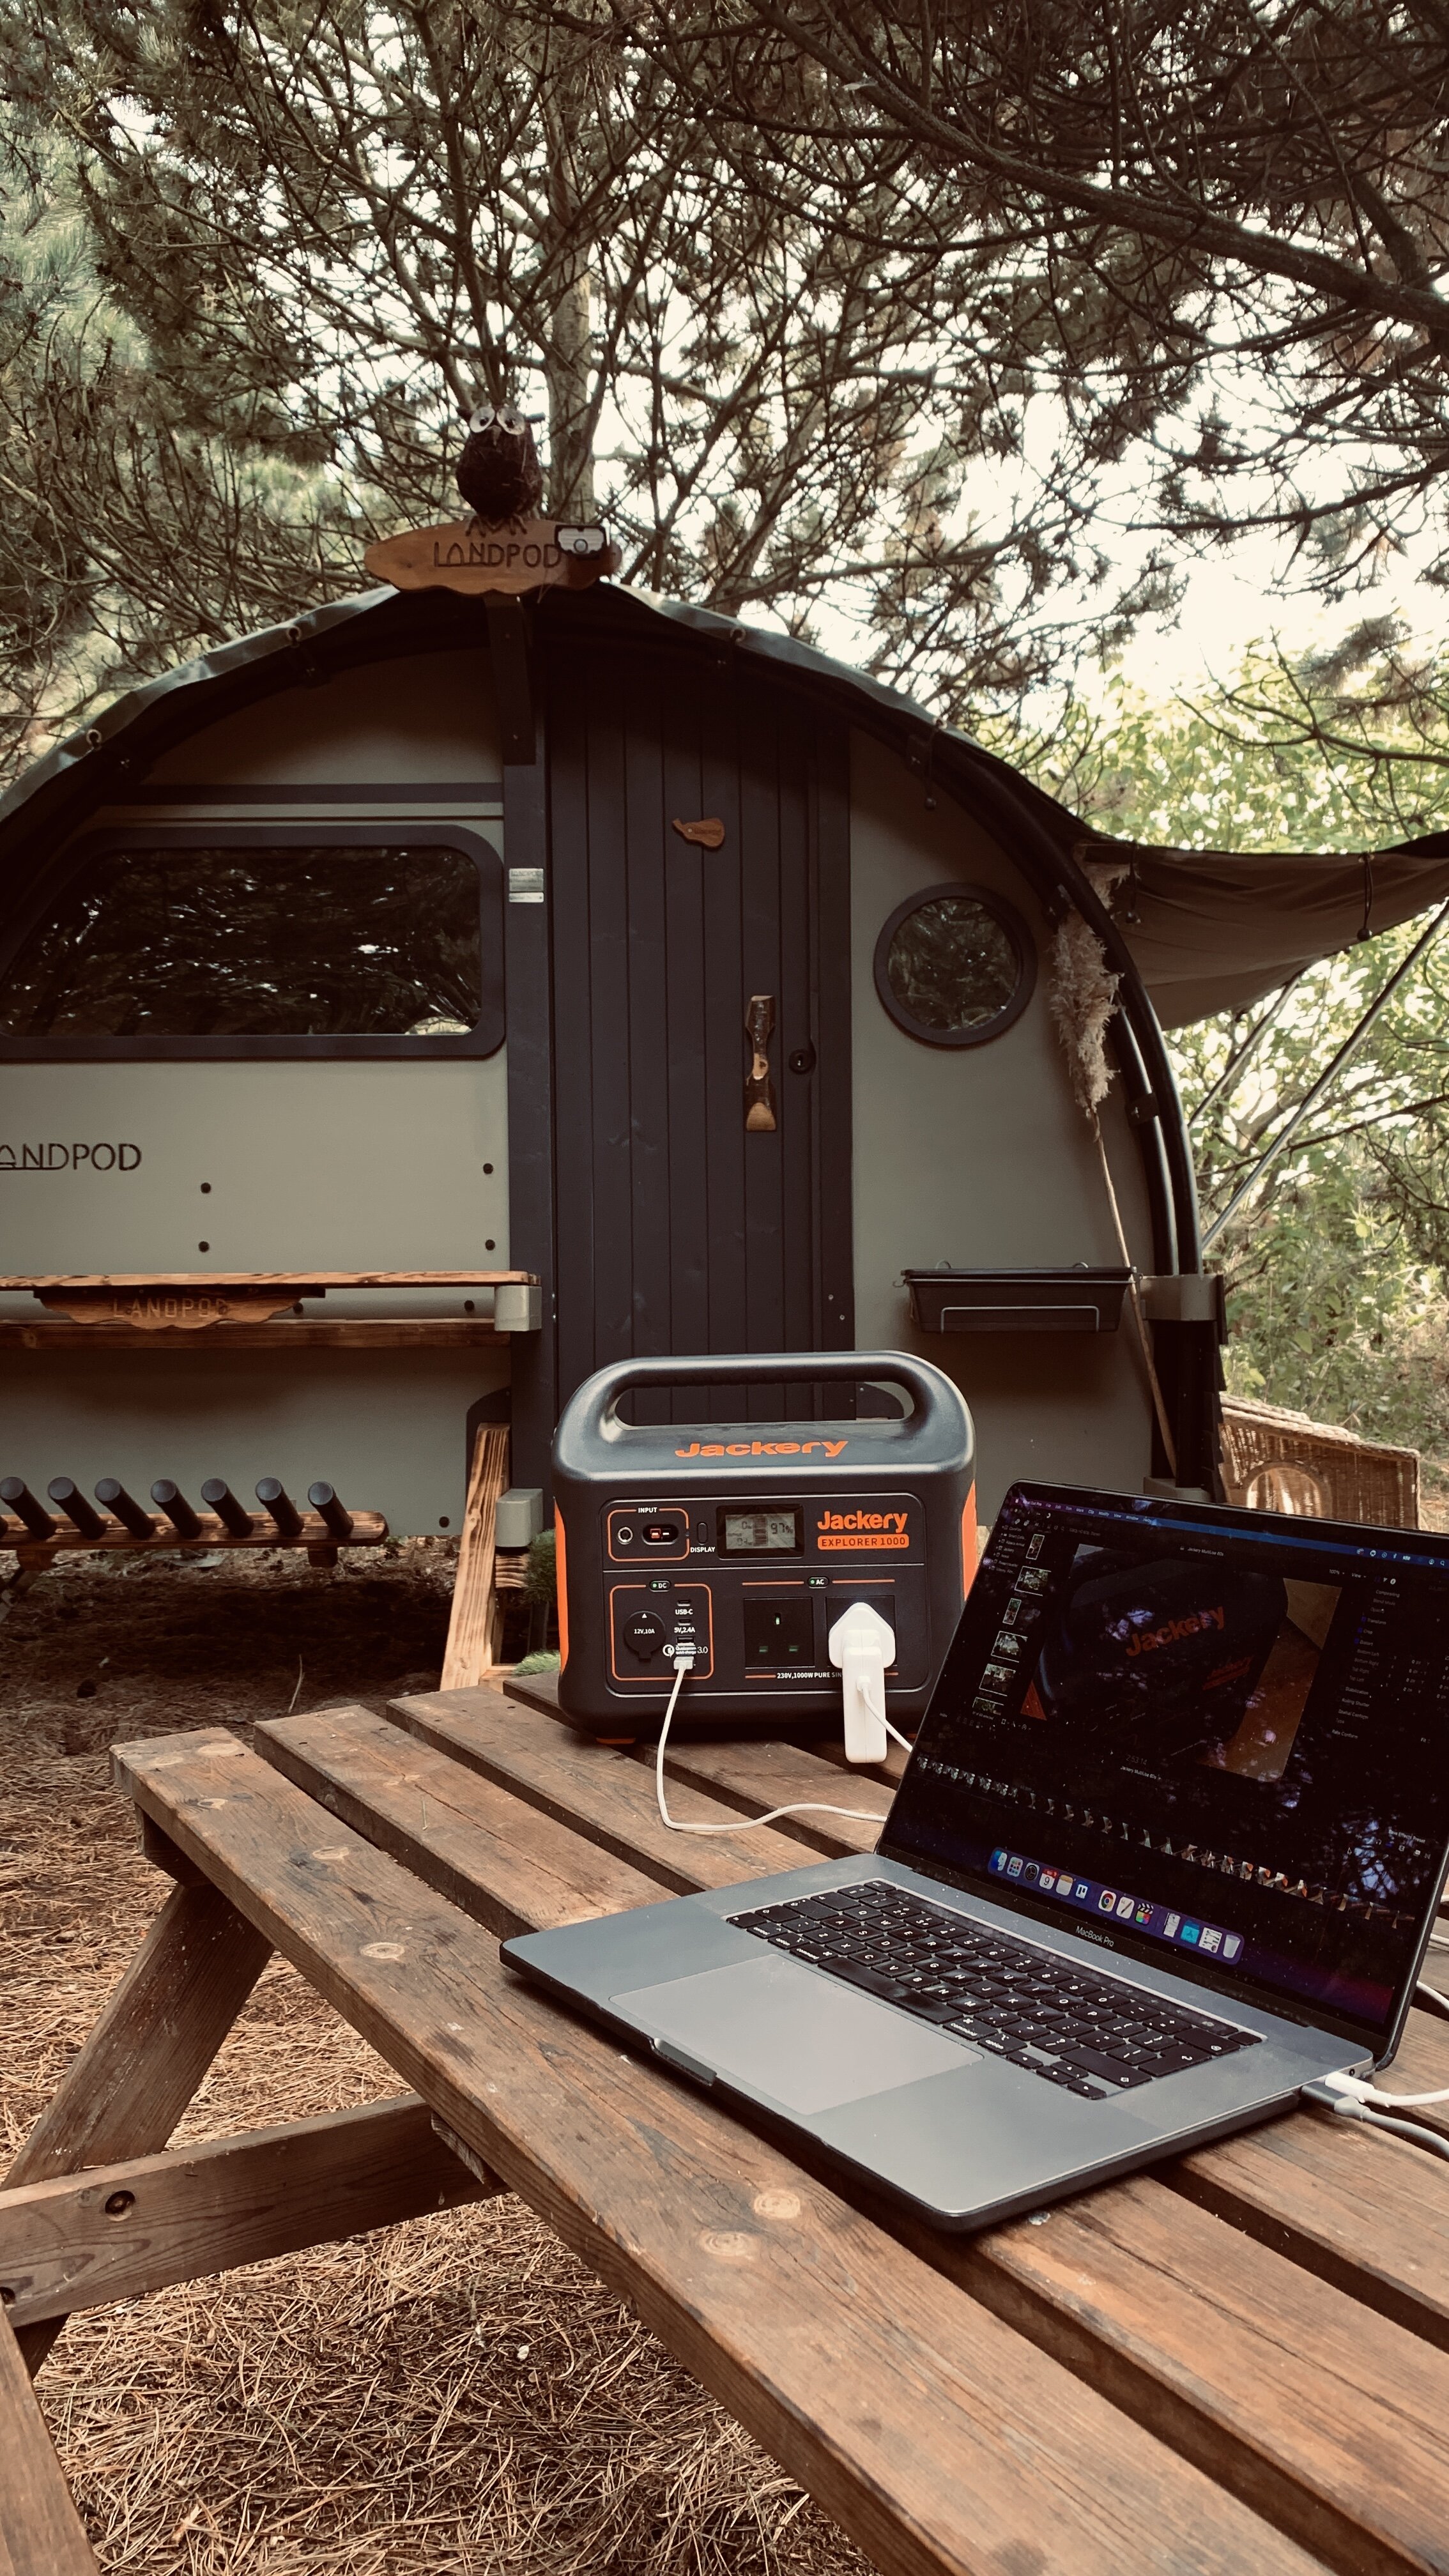
While I love having an office in a house after a decade of working on the move, it’s great to take the laptop out to different parts of our site on a nice day, and edit films and photos beneath the trees. The Explorer 1000 keeps a laptop charged for literally days, and my Mac is a 16” beast which guzzles power. Need to plug in the phone, camera batteries and even a second screen? No problem at all!

7 - EV charging!

EV charging.JPG

We have this cool little electric buggy (it’s not a golf cart!) that helps us service our site, things like taking firewood to guests and getting us to the far flung pods with fresh water and other bits and bobs. We’re careful with its charge but now and then we run so low it…erm…doesn’t move. The Jackery Explorer 1000 won’t give it a full charge or put up with the EV’s demands for long, but it can provide a quick fire juice-up to ensure our buggy gets back to its proper charging point at our house.


8 - YesBus Battery charge-up

YesBus copy.JPG

We have this awesome converted double decker on site called the YesBus. The YesBus is first and foremost a community basecamp for the YesTribe, a positive, kind and adventurous community that Em and I also happen to run. These days the YesBus splits its time between community basecamp and a rental for guests. On consecutive cloudy days the YesBus batteries, which are charged up with its own array of solar panels, can run low if lots of lights and gadgets have been left on, in which case up steps the Explorer 1000 which we can cleverly hook-up to charge the YesBus batteries. Genius.


9 - Alpackages

Jammie Dodger.JPG

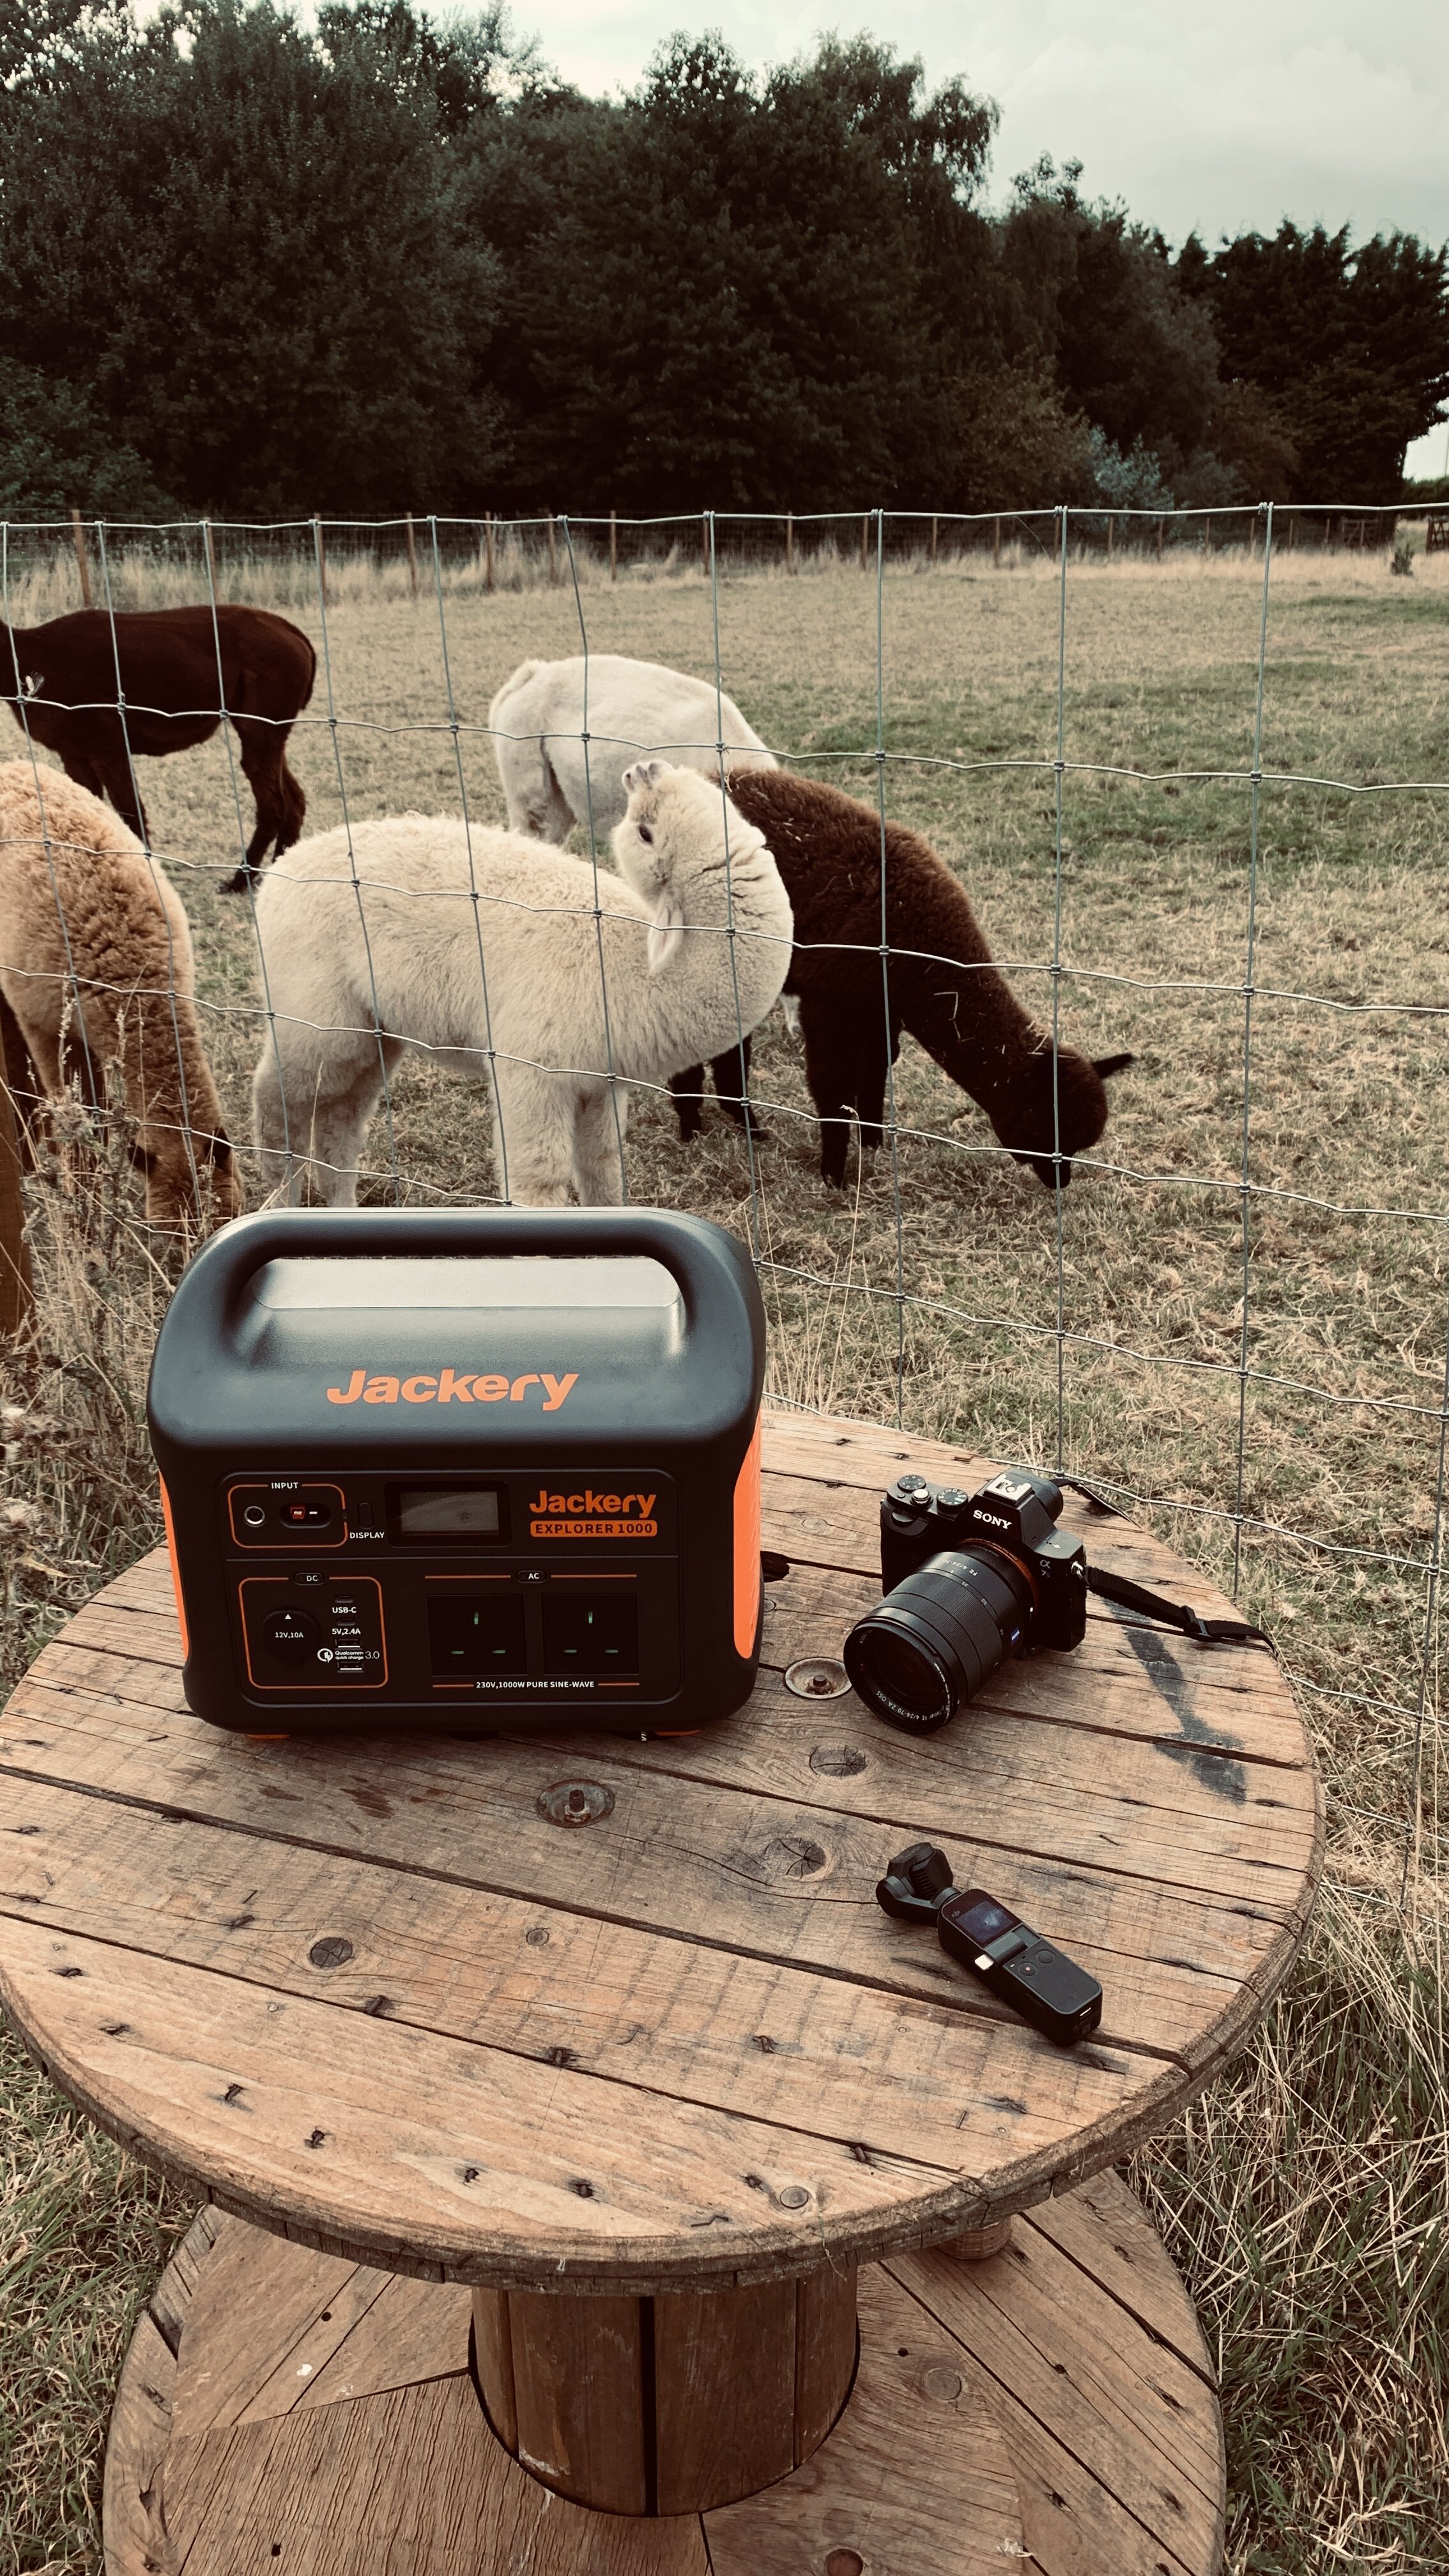
We mentioned cameras above, but keeping our phones charged up are especially important seeing as any given moment our cheeky alpacas will pull a move worth capturing. We offer alpaca feeding as one of our experiences here at Big Sky and people love photos of their hands being shnuffled by the pacas. My personal favourite for photographing is one of our babies, born just a few weeks ago, his name is Jammie Dodger and he has a marvellously bendy neck.


10 - The barn!

Next year our barn (which was actually built as a hanger for the previous owner’s plane!) will be a centrepiece for any events at Big Sky. We’re turning it into a multifunctional event, community and chill-out space and if there’s anywhere on site that really needs a power solution it’s here.

These last two days I’ve built a south-facing woodshed just outside, which conveniently provides just enough space for both SolarSaga panels to spread out and sunbathe.

Just inside sits a brand new charging bench where the Explorer 1000 Power Station lives when the site is open. We’ve yet to give it a proper run-out as the barn is still mostly a shed for building bits and bobs for the site (the mancave game is strong!) but already we can tell we’re onto a winner with this system. It currently powers batteries for all manner of tools, the remote WiFi router, security camera modules, a hefty speaker, lights and most importantly, the fridge in the bar!

We’ll soon have a big drop-down screen for film nights and corporate team build presentations and the Explorer 1000 will power the projector, too.


Potential future uses

Film nights - these are just around the corner and we know the Explorer 1000 will power our projector AND popcorn maker. Bring it on.

Field kitchens - we have plans for a large field kitchen in our camping meadow, a place where guests can meet, cook, wash up and eat. Jackery will come in handy for powering electric cookers, the lights, people’s phones and no doubt other bits and bobs.

Bell tents, tipis and domes - we’re always thinking about different types of accommodation at Big Sky, the more unique the better. Each will need power so guests can be comfortable and we’ll definitely be using Jackery power stations and panels to keep the lights on!

It’s hard to remember what life at Big Sky was like before we got our Jackery gear, but if we use anything on site more than the Explorer from now on then I’ll eat….one of the solar panels.

We couldn’t be happier with the Explorer 1000 and on a sunny day the two Solar Saga batteries take the battery from 0% to 100% in around 5 hours, meaning most of the year we’ll not go wanting.

With two more field kitchens to build on site, both of which will need their own power units, we can certainly see how other Jackery portable power stations will become a part of our future. As an aside, if I was converting a van or a tiny home I wouldn’t consider anything other than a Jackery Power station for the power source. It takes the faff out of running solar-powered electrics through a vehicle or van, and obviously for shorter camping trips out of a tent or a vehicle, Jackery would be a safe option keeping a trip away comfortable and full of juice!

Jackery.JPG

If you like the sound of this gear there are often decent discounts available on the Jackery store and if you’re considering your power options and have any questions please feel free to shoot me any questions via the comments below, or through Instagram channel @DaveCorn.

I’m always happy to chat about the different ways we use #JackeryUK and hope you can come enjoy a stay with us at the Big Sky Hideaway sometime. At the very least you know a cold drink will be waiting in the barn!

Powertraveller Solar Adventurer

I’ve worked with Powertraveller for over a decade, charging my gear on river, coastal and land-based journeys which enabled me to navigate safely and share stories from my adventures.

Recently they sent me some of their latest gear and I thought I’d write a review of each bit of kit. I’m starting with one of my favourites; the Solar Adventurer, a clamshell solar panel incorporating a Lithium Ion battery, USB output and a carry case.

If you’re heading off into the wild and need a way to charge your gear, one option is to harness the sun. I have a soft spot for the Solar Adventurer and if I’m ever unsure whether mains power will be available this will be one of the first items in my bag.

It’s a solid option as a charger for short journeys, and also as a backup supply for anything USB-powered: phone, gps, headtorch, portable toothbrush etc.

On longer trips I’ll have a few charging options but the Solar Adventurer, at the very least, is an emergency guarantee that I’ll be able to generate power remotely.

Charge from the battery and top up via via solar

Charge from the battery and top up via via solar

Why solar?

There are plenty of options these days for portable power and, assuming sun isn’t going to be in short supply, packing a solar panel is a strong choice. I’ll be covering standalone batteries, power packs and solar panels later in this Powertraveller series but the £74 Solar Adventurer (and it’s new sibling of the same price - the Solar Adventurer II) is a simple lightweight option for USB-powered electronics. Coming in at 265g and sized at 170m x 96mm x 22.75mm when folded, it’s an easy slide into a bag.

So, how does it work?

This is pretty simple. Unzip the carry case and open up the panel. Make sure the panel is clean. Face it toward the sun and let it charge up.

Situated above the charging point is a 4 colour LED light indicator. This flashes red when the battery is at 0-25% capacity, orange for 25-50%, green for 50-75% and blue when the battery is 75-100% full.

When you need to charge your device, plug in the charging cable and the Solar Adventurer will automatically detect the plug-in and begin to charge.

Recommendation: Before leaving home give yourself a head start either charge through the mains (using charger provided) or sit it in the sun so the battery is full before heading off, then you won’t need to wait for an urgent charge.

The flashing LED light indicates how much charge is in the battery. Blue is 75%-100%

The flashing LED light indicates how much charge is in the battery. Blue is 75%-100%

I make the most of the Solar Adventurer by leaving it out as I travel - attached to a backpack (using included Carabiner), atop panniers on my bike, or on a drybag on a SUP, canoe or kayak deck (this is best for flat water paddling, where splashes are limited and conditions aren’t too wet. The Solar Adventurer is rated IP65, good for dust and water from a nozzle, so as long as you avoid a complete dunking and ensure the dust cover is in properly, you’re good to go.)

Then when I stop for a meal or a coffee, I religiously plug my phone in for a top-up. I film, take photos and navigate with my iPhone so its battery takes a beating.


Best for….

  • Short one or two day microadventurers

  • Additional back-up for a longer trip

  • Camping trips

Not ideal for…

  • Multi-day adventures with various items to power, and no additional charging options.

What will the Solar Adventurer charge?

The Solar Adventurer’s battery capacity is 3500mAh which Powertraveller suggest will charge a smartphone, GPS or headtorch 1 - 2 times, a Sat Phone once, an action camera 2 -3 times and a smartwatch up to 15 times.

I have an iPhone Xs with a battery capacity of 2,658 mAh which is on the low side for a smartphone, but most phones will have a battery in the region of 3,000 mAh so you’ll get at least one full charge from the Solar Adventure battery.

Even if the battery is flat on the Solar Adventurer you can still trickle charge your gadgets by plugging them in and leaving the panel in the sun. (Make sure you leave your gadget in the shade to avoid overheating)

photo_20200905091528_6554385_0.JPG

EXPERIMENT

On a day when the weather app suggested full sunshine I sat the Solar Adventurer - with no battery charge - outside and every hour rotated the solar panel so it directly faced the sun.

It was up to the blue (minimum 75%) capacity after 8 hours of charging.

I then ran my iPhone Xs down to 1%, set to airplane mode and plugged it into to the Solar Adventurer’s USB charger. It took, 1 hour to reach 60% and 2 hours 20 to max out at 100%


What’s in the box?

As you’d expect from the new Powertraveller range, the Solar Adventurer comes in a tidy gift-friendly box, well designed and with a satisfying open.

The panel arrives in its zip up case, and also included is a charging cable, carabiner and instructions. (Instructions are also digitally downloadable on the Powertraveller website, or via the QR code provided.)


Charging in the Swiss Alps after a Via Ferrata that I didn’t really enjoy at all! Image by Dan Wildey

Charging in the Swiss Alps after a Via Ferrata that I didn’t really enjoy at all! Image by Dan Wildey

Summary

As I’ve mentioned, the Solar Adventurer has been a favourite of mine for years so I come to this review with experience and a little bias! I travel light so don’t weigh my pack down with anything I don’t need, so if an item makes the kit list it means it does the job.

As a backup charger or a main option for a weekend microadventure, I’ve never been let down. It’s super simple to plug and play and I wouldn’t underestimate the sheer satisfaction of charging your gear with free electricity.

The Powertraveller Solar Adventurer is lightweight, robust and doesn't take up much space. Plus, the zip-up cover is great for dusty or wet conditions. If you're thinking about using solar to charge your gear while travelling, this is the best panel to get started with. I don't leave home without it.

What are your favourite dry bags?

I’ve always enjoyed following your river journeys. What dry bags would you recommend using?
- Christian Soltermann


Answer

Questions to ask yourself to help decide which drybags you need.

How am I travelling?
If I’m on the water (sailing, kayak, SUP, canoe, waterbike) every day then there’s always the chance of capsize or bags falling in the water. If I’m just on a walk or a bike ride pesky rain or even heavy overnight dewfall demands a moderation of protection.

How rugged will the journey be?
Are the bags going to be tossed around? Do they need to be hardy?

What water type am I travelling on or near?
Gear will last a lot longer in fresh water than it will in ocean salt water. Salt water eats gear faster than crocodiles.

What’s the climate?
Humid or endlessly rainy?

What type of gear needs to be protected?
Electronics are key to some expeditions and are more susceptible to moisture damage than clothing. It’s not fun reaching the end of a grim day only to find your stash of dry end-of-ride clothes are absolutely soaking.


Regardless of whether or not I’m travelling on water, I’ll pack using a layering series of dry bags.

Main choice for river trips:

Main bag: Palm Equipment River Trek: Camping gear, clothing and electronics
My favourite top-layer waterproof duffel bag is the Palm Equipment River Trek. It comes in a bunch of different sizes, is rugged enough to withstand a few months of being chucked about, and it’s my first choice on a long river or ocean journey. A Palm River Trek can also happily survive in the aircraft hold, so no worries about checking it in. They’re top loaded, so ideal for gear you don’t need to grab throughout the day.


Day bag: Aquapac Upano Duffel: Day bag for easy access to spare layers, lunch and other items you’ll use during the day
Aquapac also do duffel bags, which are thinner, lightweight and suitable for shorter weekend or week-long paddles. They’re fastened longways so are good for access throughout the day, and also come with a valve so you can squeeze extra air out before doing the bag up.


Hike rucksack: Aquapac "Wet & Dry" Lightweight Waterproof Backpack - 25 Litres (788)A great hiking and city rucksack. It wouldn’t keep water out if it was submerged but I’ve used one of these for years and it happily keeps the laptop dry in rainy conditions. Good for running into town for supplies.


Inner Layers: All gear inside the dry bags packed away inside AquaPac Pack Dividers
Whatever my main outer choice is, all of my gear goes in smaller waterproof pack dividers. My waterproof pack dividers of choice are by by Aquapac, they come in different colour-coded sizes so you can easily find your gear when in camp.

Main choice for bike trips:

If I’m on the road and need good rain and mud protection for a rack-ready pannier, I’ve always gone with Ortlieb. The back roller panniers are great for the rear rack, and for a handlebar bag the Ortlieb Ultimate 6 Plus has lasted me for years, on scooters and tandems and Elliptigos and water bikes and even normal bicycles.

And finally, to keep the smartphone dry but still usable, Lifeproof know what they’re doing. https://amzn.to/2RU6yiA

How do you purify water on your adventures?

How do you purify water on your travels, do you buy fresh or treat it yourself?
-Christian Soltermann


Answer:

If you’re travelling in a remote area and can’t replenish fresh water, I recommend two solutions:

For in-camp filtration (as long as you’re near a river or lake) a gravity filtration system will give you a couple of litres of drinking/cooking water in half an hour, check out this Sawyer water filter system for one of the best on the market. Sling the top bag (with river/lake water) higher than the lower bag and let gravity do the rest.

For fast access to drinking water there are now multiple bottle options that come complete with filters. Water-to-Go bottles come with a bomb-proof filter that enables you to fill your bottle and drink straight away through the filter - these do leak a bit so only use if you can guarantee keeping your bottle upright at all times.

Katadyn have numerous options, they’re very good at what they do, as you’d expect from products with ‘Pro’ in the name. They’re expensive though and so are the replacement filters.

My favourite bottle option is an innovative plunger design from Grayl. Fill your bottle to the line, plunge with the lid (almost like you’d do with cafettiere coffee) and hey presto, in 15 seconds you’ll have a litre of fresh water.

As Anwar, a beautifully dry, focused and cunning West Bank hiking guide used to say, in a three-worded display of absolute, live-giving genius. “Drink water, please.”

From Wild Camping to Comfort Camping with Go Outdoors

When travelling light is second nature it's easy to forget that life's little comforts are easier to take camping than you'd expect. Emma Taylor teamed up with friends and puppies to test out some comfy Go Outdoors gear for their brilliantly titled #GoOutpaws campaign.

[This is paid advertorial content, which we totally enjoyed!]

Wild camping has become second nature to me now, whereas a couple of years ago I would have had to look up the term. I remember my first ‘wild camp’, which was on my friend Anne-Laure’s rooftop in Shoreditch (hardly what you might call ‘wild’!) and my second was a few weeks afterwards on the night of the Summer Solstice with The YesTribe.

P1110850.jpg

I enjoyed sleeping ‘out’ without a tent so much (my friends thought I was bonkers) so I went alone to Hadleigh Castle with a bunch of people I didn’t know, just to sleep out under the stars and it was utterly magical. So much so, that I have done it countless times since and now don’t even need to think about what to pack, I’m already out the door.

So now it’s time for a new challenge - camping in the traditional sense of the word. I had no idea that camping could be so comfortable without becoming (that wonderful combination buzz word we all love) ‘glamping’. When asked by GO Outdoors to test out some of their equipment, we thought we’d set ourselves a new challenge - camping in comfort! With more and more of our friends starting families, we set aside our usual considerations of how much we could personally carry on public transport, and started venturing outside the box into the realms of ‘what if we had a car and weight was no object?!’.

We started with the largest item on the list - the tent. We had no idea they came with so many interchangeable options! After much deliberation on the GoOutdoors website and using their super handy comparison tool, we decided to go for their own brand of Hi Gear Voyager Eclipse 6… or as we lovingly dubbed it, ‘The Spaceship’.

P1110937.jpg

After getting over the initial shock of how big and heavy the pack was (a whopping 22kg!) we realised that one handle each made it pretty easy to manage. We were slightly skeptical of the store’s own brand at first but perceptions were blown out of the water once it was up - this was a well designed piece of kit. Being one who is usually happy to rise with the sun on a campout, I am now definitely a fan of the Eclipse style bedrooms, which keep the morning rays out with a blackout blind to allow some extra snooze time. Another very cool feature of this tent was the bedroom configurations and how flexible they were - you could choose to have not only one but two or three bedrooms - perfect for group camping. We invited some friends to join us camping and there was plenty of room for everyone, even the dogs.

We couldn’t believe how much room there was in there, including an enormous porch, which will come in very handy for those unexpected downpours we’ve been getting recently - we were even thinking ahead to Yestival planning later this year and upgrading the staff quarters in the festival field! The tent had plenty of little (and large) pockets to keep gear, hooks to hang lamps and clothes from, options to open and close doors and windows, along with flysheets to keep the bugs at bay and power access points if we ever needed to plug in our widescreen, Playstation and blender for a truly luxurious escape from the city.

P1110905.jpg

Next largest on the list was the sleeping situation and Dave and I have never tried out a double sleeping bag - it had to be done. Opting to trust the GO Outdoors own brand Hi Gear again, we went for the Divine Double in blue and I must say, that nights’ sleep was divine indeed! There was plenty of room in there, it’s super soft and we were both toasty all night. The only disappointment was not to have a zip on either side so you can escape without having to assault your partner trying to get out. Otherwise though, this is a perfectly cosy duvet substitute for a night under the stars with your bear.

P1110915.jpg

Normally ones for lightweight inflatable roll mats, we decided that we needed to upgrade to a full on double airbed to match our new comfy double sleeping bag. We went for the Coleman Maxi Comfort Double Airbed - go big or go home, right? The reason we opted for this one over the other potentials was because of it’s unique Dual Chamber Inflation, which means that no matter how fidgety I get in the night, Dave won’t feel a thing on his side - and it works pretty well in that respect. Weighing in at a sizeable 3.7kg, it packs down pretty flat into a bag and is totally worth the effort - speaking of which, we definitely recommend investing the extra £3.99 on the Hi Gear Bellows Foot Pump to save you from going lightheaded when blowing up this beast. My past experience with air mattresses is that they always deflate a little during the night but I was surprised to see this one hold it’s own. It’s strong, the double lock valves are simple to use and they actually work, and the ultimate test was inflating it outside the tent on a bed of thistles (we only spotted them afterwards!) and having the dogs wander all over it and it still lived to tell the tale.

P1110824.jpg

One job which is a guaranteed chore for us every time we go to The YesBus now is filling large 20 litre containers with drinking water and transporting them to the bus in a wheelbarrow, unless we’re lucky enough to have a car on site. As you can imagine, this task can be quite a lengthy one as the tap is 500 metres away and filling five containers and transporting them across campus is no easy feat. For this reason, when we saw the 40L Aquaroll Rolling Water Container, we were overjoyed at this potential new solution to our water carrying dilemmas! It’s a brilliant bit of kit and does exactly what it says on the tin and with a handy additional tap and and stand, it’s a perfect and essential kitchen sink, water fountain and shower source in one.

So, now we had our water source and a mega comfortable bedroom in our giant spaceship sorted, this adventure called for some fun outdoor activities that the pups and kids (big and small) could enjoy. GO Outdoors have a pretty cool range of giant versions of games and toys I used to love when I was a kid so I was in my element choosing from an Aladdin’s Cave of Nerf Guns, Super Soakers and lawn games. Always the child’s entertainer, I opted for the Handy Heroes Giant Bubble Making Kit. I have always wanted to try it after seeing them wow the crowds on London’s Southbank and it did not disappoint! It comes with everything you need and even the bubble mix is non-harmful to the environment.

To fuel the creatives among us, we also go the Handy Heroes Stone Painting Set, which comes with a bunch of colours and a tiny brush. I was super impressed on finding that the kit even includes the stones, but then a little abashed on discovering that the ‘rocks’ were created with moulds with evidence stickers stating they were ‘Made in China’. This kit did the same for our mental health as colouring books do for adults, it was very therapeutic, it’s just a shame the stones weren’t natural.

DSC05288.jpg

Now for the real laughs, when the Handy Heroes Giant Racket Set and the Pop Up Football Net came out. Both really inclusive, everyone could join in the fun and it was great quality gear that will keep coming out throughout the summer. You don’t need to construct anything or fit parts together, they are instant and ready to go. The rackets are massive and there’s a choice of playing with the ball or shuttlecock, even with the size of the rackets, I still managed to miss the ball! The football net comes all twisted into a clever little flat packed bag and just pings into action when you take it out. I thought getting it back in there would be a mission but it came with simple diagrams and instructions that made it easy.

And no lawn party is the same without a comfy picnic blanket to save from unwanted prickles and a damp bum - we chose the Hi Gear Fleece Picnic Rug as it was a great size, was soft on the top size so the kids and puppies were happy, and has a waterproof backing to prevent moisture from getting through.

All in all, we loved discovering how comfortable family camping can be and aside from the heavy tent, there really wasn’t too much compromise on weight and bulk in order to have a much more luxurious camping experience. This is the perfect collection of gear for a family who are new to camping. It’s all super simple to use, really comfortable and fun with no concession on quality.

Of course, you could take a complete change of tack and try out hammock camping. Check out this tree tent guide by Globo Surf.

Would I take all of this on a trek up a mountain on my own? No. But with a group of friends and family escaping for a few nights making fun memories in nature and in comfort, then it’s a big YES from me.


nb. This is a sponsored post, but the experience and views are authentic!

Tentipi: Camping for the spacious at heart

Whether you're heading out on a micro adventure, a long-distance expedition or have a garden party to organise, here's a look at what Swedish outdoor experts Tentipi have to offer this season.

Hiding out with a 1000 miles of Norwegian coastline under the belt

Hiding out with a 1000 miles of Norwegian coastline under the belt

As the warmer months approach it's natural to spend more time outside, which for me means figuring out a variety of different ways to sleep in nature. I've always loved the Scandinavian approach to camping and since meeting a super chilled-out Torsten Gabrielsson midway through my Hobie kayak trip from Oslo to Helsinki in 2014, I've been a big fan of the company he runs marketing for, Tentipi. 

I should say up front that while there are cheaper tents on the market I've always preferred spending a little bit more on a product that lasts. The cheap tents of my twenties always ended up with broken zips, torn tightening-straps and a cluster of snapped pegs, so a tough waxy rainfly, bomb-proof pegs and a zip that two rhinos couldn't pull apart always gets my vote. 

With this in mind, when Tentipi asked if I'd like to write about their range I was more than happy to do so, they've been in my adventure bag for the last four years and I can't be more of a fan.


OLIVIN 2

My Tentipi love affair began with the first iteration of the Olivin 2, the smallest tent in their range and a reminder that a little extra space makes for a more comfortable wind-down after a long day's work. Made for two people + bags, the Olivin 2 is plenty high for sitting upright and getting changed in, boasts a built-in inner tent and vents in the roof and sides. At a gentle squeeze you could sleep a 2 child family or swing three cats in there; your choice. 

Stockholm, September 2014 - Image by Torsten Gabrielsson 

Stockholm, September 2014 - Image by Torsten Gabrielsson 

In fact, during the first year of the YesTribe, the Tentipi crew challenged us to break the 'world record' for the amount of people that could fit inside an Olivin 2. Believe it or not, we managed 25!

DSC_0230.jpg

The Olivin 2 weighs in at 3.4kg with the inner tent so it's not a backbreaker, and I'm still surprised at what comes out of that bag. There's such a power in carrying a temporary home on your back (or in a kayak or panniers) and I love that process of creating a basecamp. Turning a bag into a shelter is beautiful, and there's nothing more simple than putting up a tipi like an Olivin. Eight pegs, one pole. Welcome home.

Read more about the Olivin 2


Erecting a tipi

One of the factors that draws me to a tipi is the ease of putting it up. No longer are there multiple stringy poles to feed through tight sleeves, instead you peg out the octagonal tent first and then give it some shape with just one chunky (but lightweight) pole. The process is just delicious, I adore simplicity (it goes very well with my intelligence levels) and a 90-second put-up average makes bad weather and fatigue days more bearable. 


The Zirkon

The Zirkon family of tents is seven strong. There are four CP tents, which are heavier and built for comfort, and three Zirkon light tipis are exactly what they say on the tin - they're lighter and more manageable. 

A northern Norway camp. Photo by Yellow Matilda

A northern Norway camp. Photo by Yellow Matilda

Last Summer I decided to carry a Zirkon 5 Light tent for a 9 week expedition along Norway's coastline. It gave me loads of room to spread out clothes dampened by a long day on the water, and even without the inner tent it provided more than adequate shelter for those moments when I got sick of the gorgeous views outside (*this never happened). 

View the full run-down of the Zirkon range


Hekla Firebox

I rarely came off the water dry in Norway, so the option of enjoying a fire inside was a big attraction to the Zirkon. In full transparency, it was a fairly warm Summer/ Autumn in Norway so I barely used the Hekla firebox, but it's pretty cool to get a fire going inside and I'm looking forward to some cosy winter camping with this set-up in future.


Why a tipi is worth considering over another type of tent

  • They look really, really good
  • Plenty of space inside
  • Hard-wearing
  • Simple to erect
  • Stoke up a fire inside (model and size dependent)

OTHER TENTIPI PRODUCTS


The Canopy

Adding a Tentipi canopy to your Nordic tipi gives you more room to hang out and it works great as a stand-alone too, if you really want to pack light.


Rucksack Frame


Okay, some of Tentipi's larger tents are a bit heavy so this year they built a rucksack frame to easily carry them to base camp. Of course, you can use it to transport logs, water containers or your best buddy as well.


The Half Fleece Floor

12170_12190_FleeceFloorHalf.jpg

Tired of cold feet and dirty shoes? Tentipi's new half fleece floor has a cosy surface, even for bare skin. 

It is fully damp-resistant, like all their other floors. Having half a floor in your Nordic tipi means you can have a surface with floor to sleep and hang out on, and one without floor where you put your dirty shoes.

They are also fitted with Velcro so you can join two half fleece floors together to make a whole floor, or combine a fleece floor with a half ordinary floor.


Half inner tent.jpg

Where do you put your dirty shoes when camping?  The new half innertent from Tentipi creates two rooms inside your Nordic tipi, one to sleep in, and one for cooking, wet dogs and smelly socks.


Safir 7 CP

This is the classic Safir 7 cp from Swedish tent maker Tentipi. You can have an open fire inside or fit it with a stove for really cold nights. It's made out of cotton and polyester which keep rain out while letting condensation vent away. You can fit up to seven people in this one and it's full standing height even for tall guys, at the same time as packing down into a kayak or rucksack.


Stratus 72

Okay, I know that you're not going to bring this one on your next kayak expedition around the Shetland islands, but in case you discover true love on that trip you might need somewhere to celebrate your wedding! You can rent these amazing Stratus 72 tents all over the UK and in many other countries.

And in case you're tired of your 9-5 at the office, why not change careers and start your own Tentipi rental? Just sayin'...


The Zirkonflex

For basecamp or for garden parties, the Tentipi Zirkonflex can be folded up half way for panaorama views or all the way to use as a sun roof on warm days.

And finally, for a full rundown of Tentipi's products or just a sumptuous browse of gorgeous pictures of tipis in beautiful places, check out www.tentipi.com


The Schiller Bike - fit for travel

The Schiller Bike - fit for travel

I'm a week into this Schiller bike journey around Norway's coast and the unusual craft that I first tried one week ago today has now become familiar, and seeing as 90% of the questions I've faced so far revolve around my waterbike, here's an attempt to outline just how fit it is for travel.

The Ultimate Microadventure Kit

The Ultimate Microadventure Kit

If the idea of a Microadventure has appealed to you but you haven’t yet enjoyed a night sleeping wild in the great outdoors, the answer is to keep it simple. I always keep a Microadventure bag packed and ready to go should I take the fancy, so I thought I'd share with you my choices for a perfect lightweight Microadventure set-up . Enjoy, then head out with some friends to enjoy a night under a clear, star-filled sky.